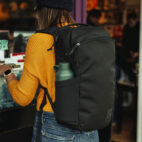
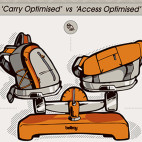
Carry Awards
 Insights
 Liking
 Projects
 Interviews
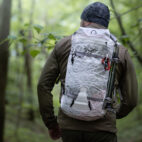
Road Tests :: Poler Excursion Pack

We figured if you’re going to test a photography backpack properly you need a photographer to do it and this is where David Green comes in. A photographer by trade, David is also handy at filming and animating, having put together Bellroy’s stop-motion videos. His love of photography is only rivalled by his love for bikes, basketball and eating challenges. Thanks for the great road test, David, and hope you guys enjoy the read…
–
With a brand new Poler Excursion Pack (with camera insert) in my possession, and an Easter long weekend at hand what else was I to do…it was off camping – an excellent opportunity to put the pack through its paces.
The pack
First impressions were that the pack looks great. It’s simple but well thought out design that doesn’t have any unnecessary bells and whistles (actually it does have a whistle! I’ll get to that later). I was road testing the burnt orange colorway, but it comes in a host of colorways including navy, khaki, black and green camo. The pack’s main body is made of “1000D Campdura fabric” which felt durable, up to the job and what you want when you’re out there in the wilderness. The base is leather which, given that it’s designed as an outdoor pack, should mean it stands the test of time.

Poler have put together this backpack to either run as just a backpack or as a camera bag, which can be done by adding the camera insert that is sold separately. I primarily ran the pack as a camera bag for the weekend. The camera insert is padded to protect the camera gear inside, and is made of the same 1000D Campdura fabric as the backpack (doubling the protection – good peace of mind for valuable camera gear). The internal lining is 420D nylon. It’s simple to fit the camera insert into the Excursion pack, as the main front panel unzips all the way down. The camera insert’s front panel also zips down all the way which means accessing camera gear is straightforward. Internally there is a Velcro padded divider system to organize your gear. It’s no fuss and easy to rearrange. Below was my setup for the weekend. Unfortunately showing the camera body+lens in the pack is problematic when you only have one camera body! However, I loaded up the pack with a DSLR and four sizable lenses and still had room to spare.


The Excursion Pack also comfortably carries a laptop. Given I was camping it was strictly left at home but when at hand there is a well concealed easy-access zip running along the top of the pack for stowing it away safely. Once zipped up you pull back the flap and you’d never know it was there. The laptop fits just as well with or without the camera insert fitted. Internally the laptop pouch is padded from both sides, and there is a sort of safety strap you Velcro down once your laptop is in. I wasn’t totally convinced on why the Velcro strap was needed. Unless you’re opening up the pack upside down I couldn’t imagine the laptop going anywhere.

The Fit

Sizing: 6”1’ / 186 cm and 170 pounds / 78kg
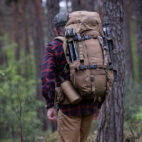
One of the beauties of this pack is that you don’t feel as though you’re wearing a camera backpack. I’ve used other camera backpacks in the past with enough secret compartments to hide lots of camera gear. This backpack gave me ample storage room yet still retained a relatively slim profile. For me, keeping the center of gravity close to the wearer (especially when the pack is fully loaded) makes a huge difference to long-term comfort. Other bulky camera backpacks I have used that don’t have a slim profile tend to have the weight situated out behind the wearer. This pulls you backyards, and ultimately is where the ergonomic design falls down (pun intended). The Excursion Pack wore well when I first put it on and it still felt great after a few hours on my back.
Other features

On the bottom of the pack are two ‘lash downs’, which allow a jacket or tripod to be strapped in.

Leather pull-tabs make zipping zippers a breeze.

The chest buckle has an inbuilt whistle.

There are two organizer slash pockets on the outside. The top pocket is the entire front section – big pocket. The bottom pocket is just the bottom right corner, ideal for a phone, wallet or keys. In fact it contains a small key clip inside.

The nylon webbing is seat belt webbing – super high tensile. It provides a really good option for tying/strapping things to.

The pack has adjustable shoulder straps and a padded waist belt.
Issues
The two ‘lash downs’ on the bottom of the pack are designed to be able to carry a tripod. Unfortunately the undersized straps couldn’t accommodate my tripod. As far as tripods go it’s quite small. It’s a nifty carbon fiber travel-specific tripod, so I imagine this would be an average tripod size for someone heading out to shoot landscape. It was disappointing and something that could so easily be resolved with longer straps.
Another issue relating to the ‘lash downs’ was that they were on the bottom of the pack. For me it was just a bit of an awkward spot to have them. I can see the benefit of keeping the weight low in the pack, but when in use they prevented the pack from being stood upright when you put it down. I ended up tying my tripod to the nylon webbing running up the side of the pack; it just seemed a more practical place to strap it.


Another annoyance was to do with the front slash pocket. Inside is a small clip for keys and the like. A great idea but the zipper kept on catching on it as I tried to open up the pocket. Perhaps in time as the materials and zips soften this may improve.
And finally it’s what’s missing…a rain cover. Given I was carrying cargo as precious as camera equipment and it is an outdoor pack, I would have loved to have had a rain cover.
Conclusion
Pros
– Looks good
– Feels good
– Multifunctional: Backpack or camera backpack
– Fully opens to view/access camera gear
– Hardwearing materials
Cons
– Undersized tripod straps
– Front zipper catches
– No rain cover
This is a solid performing camera backpack. The perfect size to get out into the field. It’s capable of carrying a lot – really you wouldn’t need any bigger. It’s comfortable on the back and with hardwearing materials it should stand the test of time. The versatility is a plus – you can run it as a camera pack or just a regular backpack. Poler make outdoor ‘stuff’ so I would have loved to have had a rain cover option. But whether you choose the burnt orange or the green camo you’ll definitely have the coolest camper in the caravan park.