Carry Awards
 Insights
 Liking
 Projects
 Interviews
How to Keep Your Critical Gear Dry While Outdoors
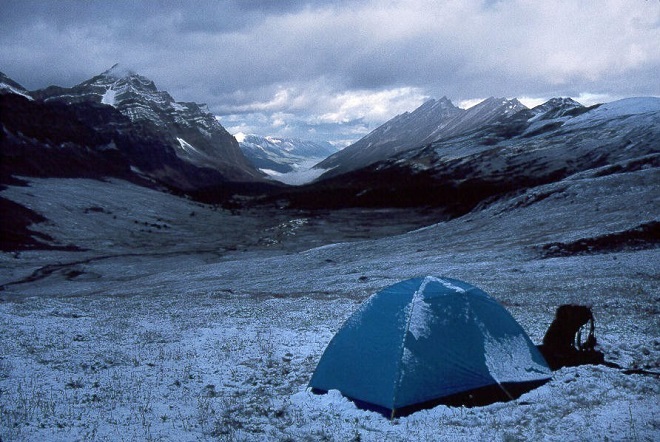
When it comes to hypothermia, prevention is better than cure. Avoiding hypothermia is one of the key things that outdoor enthusiasts should be aware of and prepare for – and adequately protecting your gear plays a major part. Jim Wood, outdoor blogger royalty, has kindly allowed us to republish his classic post Keeping Your Critical Gear Dry which provides excellent insight and considerations for protecting your pack contents from the elements and reducing your risk of hypothermia.

Although reliable statistics are difficult to come by, it’s probably safe to say that hypothermia is one of the most significant risks faced by anyone who ventures into the wilderness. Drownings, cardiac events, heat stroke, lightning strikes, avalanches, falls, illnesses, and even animal attacks cause backcountry deaths every year, but hypothermia is almost universally cited as the leading cause of fatalities. Several factors, including low temperatures, high winds, dehydration, insufficient calorie intake and exhaustion levels can contribute to the development of hypothermia, but perhaps the most dangerous is being wet.
Many years ago, as a novice backpacker, I had my first opportunity to observe hypothermia at work during an autumn trip into the High Sierras. I was traveling with two more experienced hikers, one of whom, as it turned out, was conspicuously unprepared for the conditions we encountered. Temperatures unexpectedly fell into the mid-30’s and the skies opened up with a multi-day barrage of rain, snow, and sleet. During a soggy bushwhack down a manzanita-choked canyon, this man, who was wearing only a light shirt and plastic poncho for upper body protection at the time, began behaving strangely. My other companion and I noticed that he was shivering uncontrollably, that his lips had turned blue, and that his speech had become slurred and nonsensical.
It was clear he was in serious trouble, so we stopped to make an emergency camp. Unfortunately, the jacket in his pack was soaked, as was the sleeping bag that was carried in a leaky stuff sack. So we pitched our tent and hustled our stricken companion into my sleeping bag (which had been well protected) and built a fire to help dry out some of his saturated gear. It required several hours (which included a period of delirium), along with the gradual administration of warm drinks and a bit of food, to slowly bring him around. The following morning, the sun came out and the three of us went on to complete the remainder of our trip. To this day, however, I have no doubt that if he’d been hiking alone, he would have died that afternoon.
I’ve had my own brushes with hypothermia over the years, all of which have been highly unpleasant. If there’s any lesson I’ve learned, it’s that hypothermia is an insidious adversary. Under the right conditions, it can sneak up on a hiker so easily that it’s probably inevitable that anyone who spends any length of time in the wilderness will eventually experience its effects. And unless a warm, dry refuge is available during the early stages, it can quickly become deadly. That’s why protecting critical insulation items like sleeping bags and filled jackets from water absorption can be vital to survival. I’m particularly sensitive to this issue since I backpack mostly alone, which means that there won’t be anyone around to take charge if I begin to “weird-out” from hypothermia.

Image source: Outdoor Research
Strategies for Keeping Gear Dry
Because of my experiences, I have a fairly conservative notion of what it means to “protect critical gear”. I don’t believe that it’s nearly good enough to shield these items from falling rain or snow, since there are lots of other ways for gear to become saturated. Walking through wet vegetation, for example, can sometimes soak a hiker and his/her pack even faster than a thundershower can. Likewise, on most trips (unless you’re traveling in the desert) there’s usually a good chance that you’ll need to ford rivers or streams and face the risks of either falling in the water, or having to ditch your pack if you get into trouble. So for me, the minimum requirements for keeping critical items dry include protecting them even in the event of a submersion that could last for several minutes.
Backpackers currently employ a number of strategies to try to keep critical gear dry on the trail, but regrettably, many of them don’t work very well under the worst conditions. Also, of increasing concern over the past few years has been the upsurge of interest in lightweight hiking which, in some cases, has prompted manufacturers to overstate the capabilities of their ultralight “waterproof” product offerings. It’s also caused some backpackers to make gear decisions that favor reduction of weight over functionality – choices that could ultimately have deadly consequences.
Below I’ve summarized a few popular gear protection techniques, along with reasons why I feel that each, when used by itself, is generally inadequate (with the probable exception of the Dana Designs waterproof packs discussed in the third section).
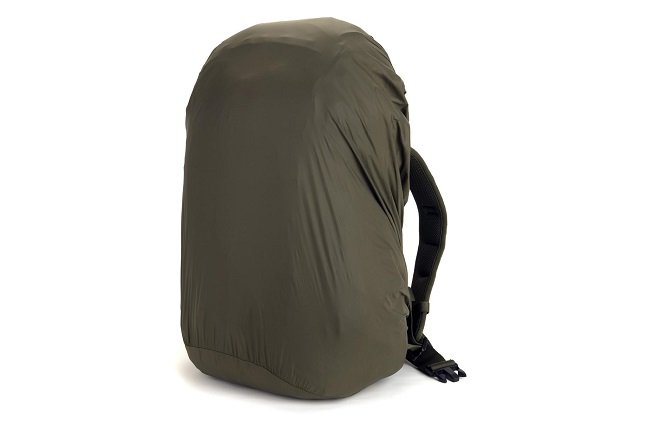
Image source: Sportsman Guide
Pack covers: A cover might help keep a pack from absorbing a lot of water during a downpour, but that’s about the extent of its value, in my opinion. I would never depend on a pack cover alone to keep critical items dry. Covers can’t protect gear from submersion, nor from the sometimes copious perspiration that can soak through the back of an internal frame (or frameless) pack. They also tend to snag easily on trail obstacles and can be difficult to keep in place during high winds. And once in camp, covers are not very useful for protecting items that have been removed from the pack.
In addition, to be fully effective, the seams of most pack covers need to be sealed by the user, and they must, of course, be removed in order to access gear on the trail. If you’re hiking somewhere that’s very wet (like the Pacific Northwest), pack covers might be OK to supplement other dry system techniques, but for most people on most trips, I believe that they’re largely a waste of weight.
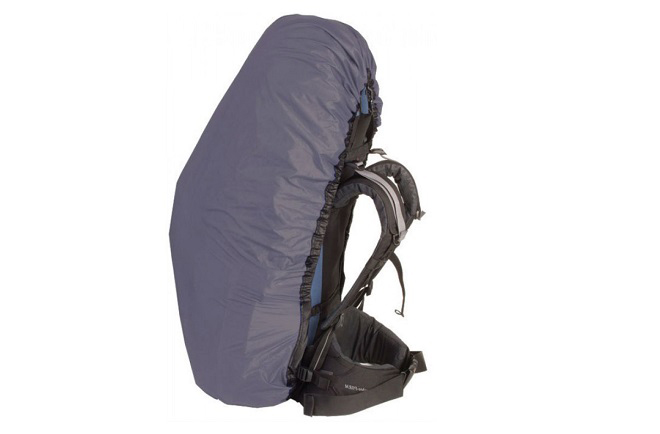
Image source: Campsaver
Ponchos: Ponchos worn in such a way as to cover one’s backpack are, in a sense, a variation of the covers discussed above and generally suffer from the same shortcomings. The “Packa” is an interesting piece of gear that combines the function of a waterproof jacket with that of a pack cover, but likewise provides no protection from immersion.
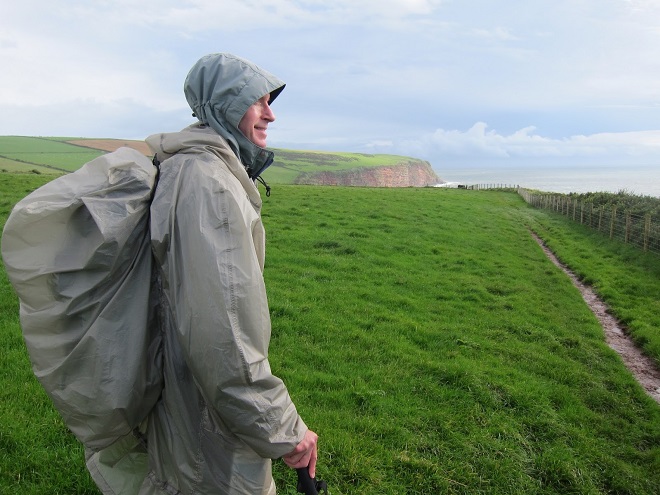
Image source: Tom Wilson
Waterproof packs: A number of lightweight packs are currently constructed from silicone impregnated nylon (“silnylon”), which is said to be waterproof. As discussed in a previous article, however, silnylon’s water resistance is very limited, especially when subjected to the stresses of gear stuffing. In addition, this water resistance, according to my own tests, can also deteriorate significantly with use. Further, none of these packs will even start out “waterproof” unless the seams are completely sealed, a process that’s often difficult with a pack because of its complex structure. Other fabrics, such as polyurethane-coated nylons are also sometimes used for “waterproof” packs, but suffer from the same seam sealing problems. And of course, the closure mechanisms for these packs are usually not secure enough to protect the contents in the event of submersion.
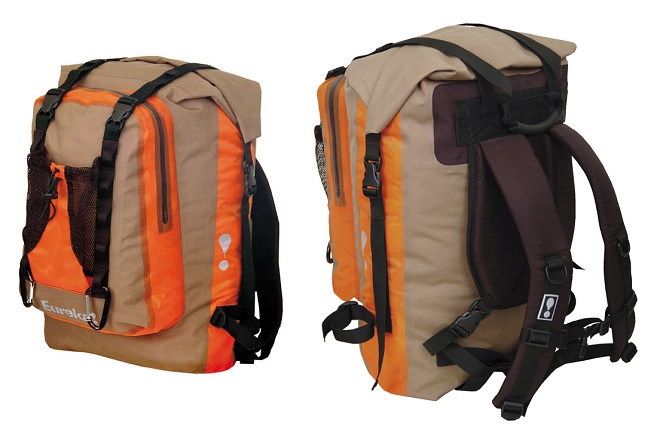
One of the few packs that I might trust as my only defense against the elements is the Eureka Dry Doc, which is designed primarily for fishermen and paddlers. Because of its weight and design features, however, I’m not sure that this pack would be practical for normal backpacking.
Another very interesting design, however, was brought to my attention by “NotFrozen” on the Lightweight Backpacker forum after the original publication of this article. The Racer X and Raid Z packs from Dana Design are essentially dry bags with pack bodies wrapped around them. The smaller pack (Racer X) includes a 25L roll-top dry bag as the main compartment, along with other non-waterproof pockets that are built into the wrap-around clamshell harness. The larger pack (Raid Z) is similarly constructed but includes a 50L dry bag. Both dry bags include purge valves and can be either used with the pack or not, as conditions dictate. Likewise, either pack allows additional gear to be lashed to their sling-type frames to further increase capacity. Although these packs appear to be targeted mainly at adventure racers and ultralighters, they seem to be flexible enough to serve well for mainstream backpackers.
Update, May 2006: In 2005, Dana Design, which has been owned by parent company K2 since 1996, was merged into Marmot, also a K2 subsidiary. In connection with the consolidation of the two companies’ pack lines, the Racer X and Raid Z products have been discontinued, though some retailers may still have inventories as of this date.
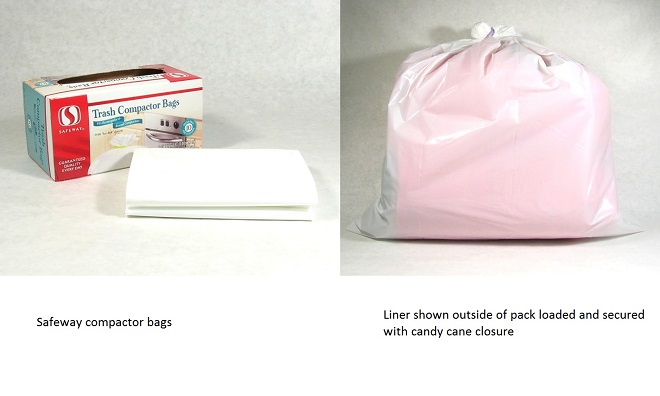
Pack liners: If neither a cover nor the body fabric can keep contents dry, then about the only hope is to protect these items using a means that dwells inside the pack. Liners are one possibility, but they have their own set of problems. Some backpackers favor either conventional or compactor trash bags for this purpose, but I’ve found that even at 2 or 3 mils thick (1 mil = .001 inch), the polyethylene from which most are made doesn’t hold up very well on extended trips. Punctures from sharp objects, as well as the wear that results from the movement of the contents against the walls of the liners, tend to produce leaks fairly quickly. I used compactor trash bags as my primary protection mechanism for a while, but abandoned them after only a couple of outings.
Some pack manufacturers, such as Gossamer Gear, offer custom-fitted pack liners, but most appear to be made from the same kind of polyethylene as compactor bags, so although I have not yet tried them, I suspect they would suffer from similar durability problems.
Another option is to construct a liner from a lightweight water resistant fabric like silnylon, which I did a few months ago. Silnylon is tougher than polyethylene, but my recent research into its properties has caused me to lose confidence in its long term water resistance. Such a liner would, of course, also require seam sealing and is difficult to repair in the field.
One final problem is that most liners make accessing pack contents somewhat inconvenient. The tops of most liners must usually be twisted and tied off with a piece of cord or rubber band in order to make them reasonably waterproof. Having to deal with these closures on the trail every time something is needed from the pack is something of a pain.
Despite all of these issues, however, I do believe that liners can play a role in a well-designed “dry system”, but not as the primary line of defense. More on this point below.
Gear sacks: After years of trial and error, I now believe that the most sensible way to approach the problem is to use lightweight, roll-top gear sacks as the primary security mechanism for critical equipment, assisted by “half-pack” liners for non-critical items. The remainder of this article will discuss this approach…
Gear Sack Criteria
Using gear sacks to keep equipment dry can overcome most of the limitations discussed above. Besides protecting critical items on the trail, they can also provide a high measure of security while in camp. There are three key factors, however, that will determine if any particular gear sack is up to its assigned task.
1. Fabric: The gear sack fabric must be waterproof enough to provide an adequate level of protection for its contents. As noted above, sleeping bags and insulated clothing are usually the most important survival items to keep dry, but cameras, other electronics, and maps can also require the same level of protection. Utility, first aid, personal and kitchen items, on the other hand, generally need less protection, either because they won’t be harmed by getting wet, or because they’re already packaged in their own waterproof “sub-assemblies”. Food that’s stored in Ziploc bags, for example, would fall into this category.
The sack fabric must also be durable enough to stand up to real-world trail use. Stuffing a sleeping bag into a gear sack, for example, can put a fair amount of stress on the fabric – both on its sides, and on its bottom, which must be strong enough to resist punctures during this process. It’s also desirable for the inside face of the sack’s body fabric to be slippery enough to allow contents to be easily inserted and removed. Fabrics with high-friction internal coatings should therefore usually be avoided. Fabric coatings should also be able to maintain structural integrity with age. Some coatings may begin life waterproof, but can dry out and/or peel away from their face fabrics, causing cracks or other leak-inducing damage with time.
2. Seam construction: Just as important as the strength of the fabric are the techniques used to construct and seal the sack’s seams. Seams are usually either sewn, glued, or ultrasonically welded, but ultimately need to be at least as strong as the fabric itself. Sewn seams are usually either of the “simple” type, in which a line of stitching joins a single layer of fabric on each side of the seam, or of the “felled” variety, where one or more rows of stitching join multiple overlapping layers of fabric. Simple seams are typically not nearly as strong as felled seams, but unfortunately, as noted below, are often found in some ultralight “waterproof” sacks.

Any seam that requires puncturing the fabric for its construction (the case with all sewn seams) needs to be sealed to prevent water leakage. Glued or ultrasonically welded seams are generally self-sealing when constructed.
3. Closure mechanism: Even if constructed from a durable, waterproof fabric using heavy-duty sealed seams, a gear bag will still leak unless it has a secure closure mechanism. The closure must be flexible enough to work equally well whether the sack is fully loaded or mostly empty. In addition, it should be convenient to use, allowing easy access to gear even when wearing gloves or mittens. And perhaps most importantly, it needs to be able to resist water penetration to the degree required by the value of its contents. Some examples of common closure mechanisms:
The ubiquitous draw-string closure that’s found on most stuff sacks is OK for organizing “ditty” items, but is pretty much useless for sealing out water when used in its simplest form.
On the other hand, if the top of the sack is twisted, then folded over and secured by tying the cord tightly around the double twist (as shown below), the closure can be made fairly water tight. Because of the twist and hook configuration, I call this technique the “candy cane” closure. It also requires that the ends of the cord be separated, and not joined with a knot, as they usually are when manufactured. In addition, for this method to work, the sack can also be only partially loaded. Further, the knot closure makes it fairly inconvenient to access gear inside the sack, can be difficult to untie if the knot becomes frozen, and if used on slippery fabrics (like silnylon), can often work its way loose with normal trail jostling. For the candy cane closure, I’ve found that wrapping a thick rubber band several times around the hook is more secure and easier to remove than a tied cord.
 .
.
A variation of the draw string closure is used on sacks like the GoLite Paddler stow sack. These sacks have extended collars that can be twisted, and then folded on top of the gear contents. The drawstring can then be cinched down around the folded collar to secure it. This mechanism only works, however, if the sack is mostly full. If the sack is say half empty, this closure is of little value by itself. To prevent leakage in a partially full sack, the top collar would need to be twisted, doubled, then tied off with a separate cord as described above, before the drawstring was cinched. This design, in my opinion, offers little incremental value over conventional drawstring closures, while mostly just increasing sack weight.
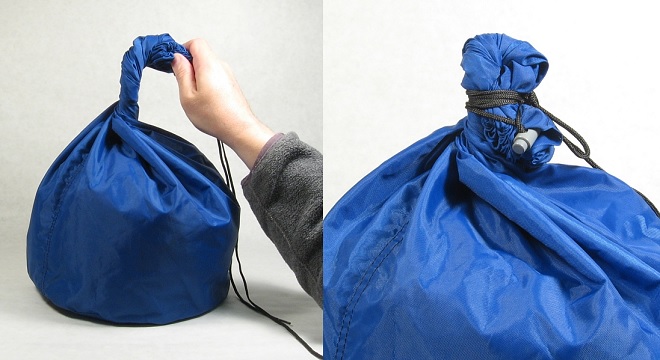
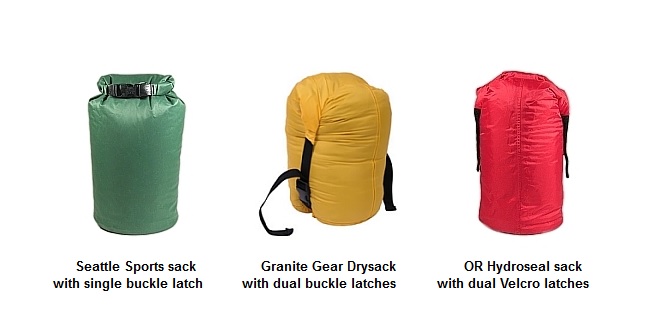
Roll tops are probably the best approach for dry sack closures. When secured, multiple folds of the bag’s fabric are pressed (usually) against a stiffener that’s sewn into the top rim of the bag. If the top is rolled down as far as possible, the bag’s contents can also push against the fabric to further tighten the seal, usually creating an effective barrier to water entry.
After being rolled, the top can be latched using either a single side-release buckle located at the top rim, one or two straps (also with buckles) that run vertically along the sack, or Velcro loop-side flaps that can mate to hook-side strips sewn along the lengths of the bags. I believe that of these three latching mechanisms, the single buckle at the top (used on most paddle sacks) is probably the most versatile, since it’s generally effective whether the sack is completely full, or mostly empty. Sacks with dual side straps tend to be difficult, or sometimes even impossible, to seal at low load levels.
Other interesting closure possibilities, which I don’t think have ever actually appeared on general-purpose trail sacks, include waterproof zipper seals such as those found on Ziploc storage bags. Even if they were used for this purpose, however, they might be problematic, since they’re often easy to force open by pressing against the sides of the sealed sacks. The water-resistant tooth-type zippers of the kind now being seen on shell jackets and pack bags are another possibility, but I don’t know if they’re considered to be truly waterproof.
Silnylon Sacks: The Unfortunate Realities
Inspired primarily by the lightweight backpacking movement over the past few years, a number of manufacturers now offer waterproof sacks made from “standard weight” (30 or 40 denier) silicon impregnated nylon (“silnylon”). Ray Jardine also includes instructions for building waterproof clothing bags in his book Beyond Backpacking using this fabric, along with a design that’s essentially the same as the Golite Paddler sack mentioned above.
I believe that these sacks are worth highlighting in part because of their growing popularity, but also because I suspect that many backpackers have accepted the claims of water resistance that are being advanced by some manufacturers and are using them under the belief that they will adequately protect critical gear. Unfortunately, for the most part, they will not.
I’ve worked with silnylon for several years and have constructed dozens of gear items from this fabric. The most significant is the tent I now use – a design that includes two doors with zippers, mesh windows, awnings, storm doors and other fairly complex features. I’m also in the process of writing a separate article entitled “Silnylon: The Inside Story” that will discuss this material’s history, physical properties, manufacturing processes and legal issues. Further, in connection with this upcoming piece, I’ve conducted a series of water resistance tests on a wide variety of silnylon fabric samples, both new and used. While there remains more work to be done, I nonetheless feel that I have a pretty good understanding of this fabric’s properties and problems.
LOW WATER RESISTANCE
As noted above, silnylon is waterproof, but only to a limited degree. Any “waterproof” fabric will eventually leak if enough pressure is applied either to the water that’s attempting to penetrate from the outside, or to the dry inside surface of a fabric that’s pressing against an external layer of moisture (the case, for example, with a stuffed sleeping bag that’s pushing against the walls of a silnylon sack that’s wet on the outside). A fabric’s water resistance is usually gauged with a device such as this that’s used to measure a property known as the “hydrostatic head”. This factor reflects the maximum amount of pressure that a fabric can withstand before it begins to leak and is commonly expressed either as the height of the water column (usually in millimeters), or as the number of pounds per square inch of water pressure necessary to initiate that leakage.

As a point of comparison, consider that even the lightest of the commercially available polyurethane-coated nylon gear sacks have hydrostatic head values that usually range from 5,000mm to 10,000mm (note also that heavier-duty dry sacks intended for paddling use typically have much higher values). In contrast, the hydrostatic head of standard weight silnylon, according to most manufacturers’ specifications, is only 1 to 2 pounds per square inch, which translates (for consistency with industry conventions) into a range of 700mm to 1,400mm. In other words, standard weight silnylon, on average, is less than 15% as water resistant as even the lightest of the conventional coated nylons.
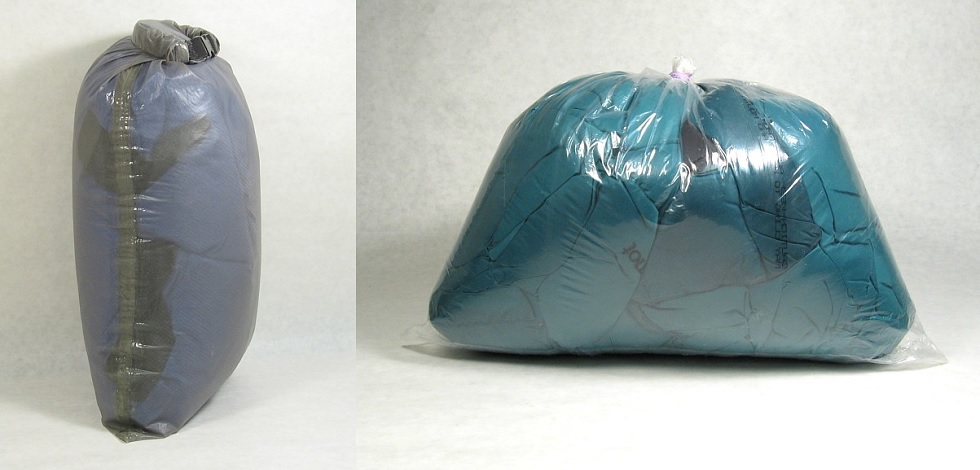
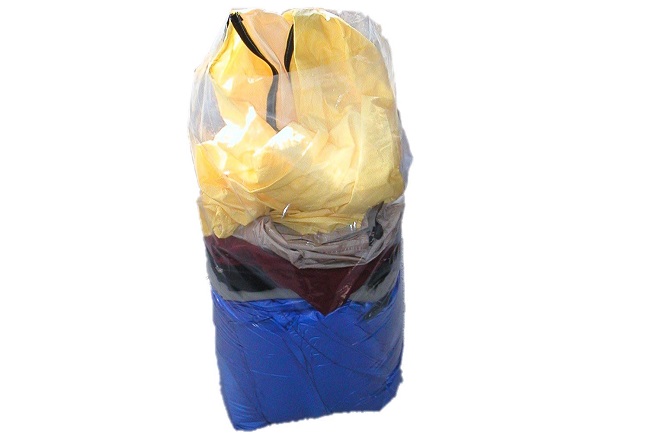
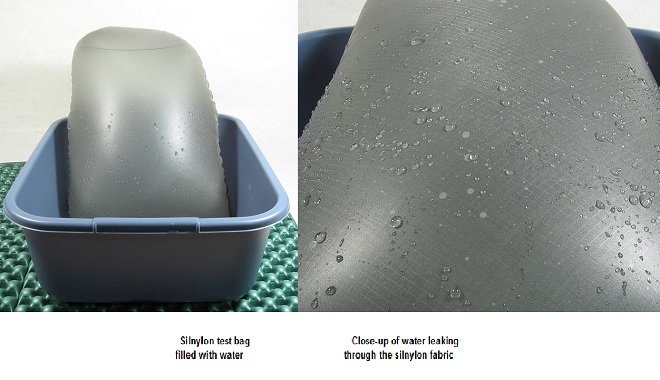
If you own a silnylon gear sack, you can perform a simple experiment to get a sense of its poor water resistance. First, make sure that the seams are sealed with a product such as McNett’s SilNet (more on seam sealing techniques below). Next, turn the sack inside out to best simulate real-world conditions, fill it with water, and watch what happens. You’ll probably find that even the minimal water pressure inside the sack will cause some leakage through the fabric. To roughly quantify the pressure, consider that water weighs 0.036127 pounds per cubic inch and if the water is say, 12″ high in the sack, the pressure at the bottom of the sack will be about 0.43 pounds per square inch (or ~305mm of hydrostatic head). But you’ll probably find that leaks also occur even near the top of the sack, where the water pressure is far less.
I recently conducted this experiment on a relatively new sack that’s made from standard weight silnylon. As you’ll see from the photos below, a great deal of water leaked through the fabric on even the top side of the bag, where the pressure was quite low. I should also point out that these results were not unique to this particular sack. I’ve hydrostatically tested more than two dozen samples of silnylon from multiple sources, and they have all displayed similar characteristics.
DETERIORATING PERFORMANCE WITH TIME
The silnylon hydrostatic head values noted above are for fabrics that are new. My testing suggests, however, that water resistance can deteriorate with use. As an example, I’ve used two commercial silnylon stuff sacks (made by Equinox) as food bags on and off for the past three years. When new, both were water resistant to about 1500mm, confirmed by testing identical sacks that have never been used. After only perhaps 20 days on the trail, their hydrostatic head values have been reduced to less than 550mm according to my measurements. They have become, in other words, not much more than splash resistant. These findings are generally in line with those of the parachute industry (for whom silnylon was originally developed), which acknowledges that silnylon typically becomes much more air-permeable over time, mandating the eventual retirement, for safety reasons, of parachutes made from this fabric. It should be noted, however, that the effects of various kinds of stresses, such as physical tension on the fabric and exposure to ultraviolet light, on the long-term water resistance of silnylon is an area that is deserving of more study.
LOW PUNCTURE RESISTANCE
With a thickness of only about 1½ mils, 30 or 40 denier silnylon is pretty thin stuff, a fact that can limit its durability when used in high stress packing applications (such as serving as a stuff sack for a sleeping bag). The resistance to punctures is probably greater when items are packed only loosely, since the fabric is under less tension, but it is still much lower than most other nylons.
SEAM SEALING PROBLEMS
To be even modestly waterproof, the seams of a silnylon gear sack must be sealed. To my knowledge, no manufacturer has yet perfected a method for sealing silnylon seams at the factory (though Sea to Summit may have developed a way to tape hybrid silnylon/polyurethane seams – see more below), mostly because silnylon is so slippery that almost nothing will stick to it. As a result, it’s usually left to the end user to perform this task, most often with the SilNet product noted above. Because of the thinness of the fabric, however, there’s often a fair amount of flex at the seams, which means that the user will usually need to apply multiple coats in order to form a durable seal. I’ve found that single coats of SilNet are typically insufficient and will usually allow water to seep through the seams.
Another issue is that most commercially-produced silnylon gear sacks are built using a single felled seam that runs the length of the bag, and one or more rows of simple seams that are used to join the circular bottom of the sack to the main body. Simple seams are probably used for this purpose because it’s difficult to sew the stronger felled seam in this situation (see above for a discussion of the differences between these kinds of seams). The problem is that simple seams allow even more movement of the sides of the fabric against the seam than do the felled seams, which makes them difficult to seal successfully. Because these bottom seams must bear the full weight of the sack’s contents (resulting in a lot of fabric stretching), the cured seam sealer will often break open with use. I’ve sealed and re-sealed the bottom seams of my silnylon sacks several times, but the sealer continues to split, so I’ve mostly given up on the idea of these bags remaining waterproof.
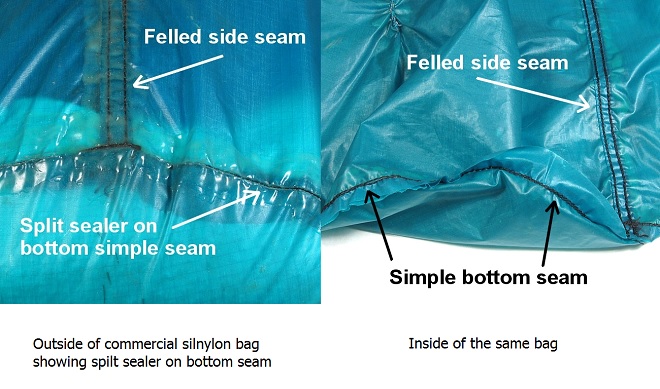
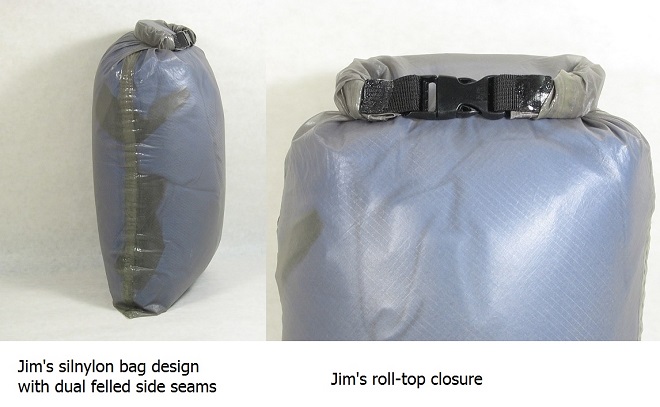
A different approach, which I now use to build my own silnylon bags, is to eliminate the sewn-in round bottom altogether. Instead, I simply double the length of the sack over to form the bottom, then secure the edges with two felled seams. This design creates a slightly lower volume sack, but makes the seams much easier to seal. By the way, before leaving this subject, it’s probably worth noting that seams on silnylon stuff sacks are best sealed on the outside surfaces only. Cured seam sealer on the inside creates a high-friction surface that can make gear stuffing difficult. The sealer is also more likely to deteriorate as it rubs repeatedly against items that are inserted and extracted.
GENERALLY POOR CLOSURE OPTIONS
Except for a new product that’s highlighted below, all commercial silnylon sacks that I’m aware of use simple drawstring closures that are not very secure for the reasons previously discussed. Even using the candy cane method of tying these drawstrings, the knots tend to work loose on silnylon sacks rather easily, primarily because the fabric is so slippery. As noted above, thick rubber bands tend to work better, but can still slip on silnylon.
THE BOTTOM LINE
For protecting critical gear, the bottom line is that although they might be tempting to use because of their low relative weights, gear sacks constructed from standard weight silnylon are simply not, in my opinion, up to the task (at least when used by themselves).
If you already have such sacks, however, it’s possible to improve their water resistance somewhat by using the treatment process described in a previous article. You will want, however, to apply the coating only to the outside of the fabric since it creates a high-friction surface when cured. Even so improved, however (I’ve already tried it ), such sacks are still not durable enough to meet my requirements. I wish it weren’t so, because like all backpackers, I’d love to save the weight.
Oven Roasting Bags
Oven roasting bags, such as those made by Reynolds are an interesting alternative to silnylon for lightweight waterproof gear sacks and seem to be developing something of a following among ultralight hikers. These clear bags, unlike their common household plastic cousins, are not made from polyethylene, but rather, are constructed from a heat-resistant blend of two nylons, according to a Reynolds spokesman. This material, even though it’s only about 0.4 mils thick, makes these bags quite strong for their weight. They are also much less “stretchy” than polyethylene bags, so they work better for containing stuffed gear like sleeping bags. These bags can even be sewn using a loose stitch (perhaps 4 or 5 per inch) to create drawstring casings, and if they’re punctured, can be easily repaired in the field using duct tape, which sticks well to the nylon surface.
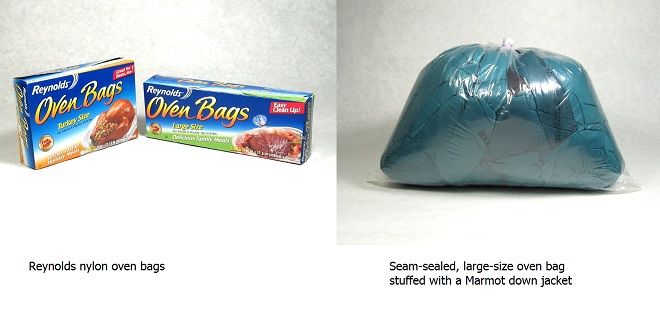
The Reynolds bags are available at most supermarkets and come in two sizes: large (16″ x 17.5″) and turkey (19″ x 23.5″). The large size bags weigh about 0.2 oz and are useful as general purpose gear sacks. The turkey size bags weigh 0.5 oz and are large enough to hold most down sleeping bags, and maybe a couple of clothing items as well. Another company, PanSaver, also sells oven bags in two sizes: 18″ x 24″ and 24″ x 30″. Their smaller bag is about the same size as the Reynolds turkey bag, while their larger size is probably spacious enough to serve as a pack liner.
I haven’t tried the PanSaver bags, but the Reynolds bags have a notable weakness. It turns out that the bottom seam is not nearly as strong as the nylon film itself and will split with relative ease. If you have one of these bags, you can perform your own test very simply. Just fill a bag with 4″ or 5″ of water, close the top, then shake it a few times. The bottom seam will most likely fail under even this modest stress. Likewise, I also found that about half my sample bags leaked water through these seams right out of the box.
If you want to use an oven bag as a waterproof barrier, I’d suggest that you strengthen and seal the bottom seam. Identifying this seam, however, can be a bit confusing, since these bags appear to have two lower seams. At the very bottom edge, you’ll note that the bag is closed where the two sides are joined. This closure, however, is not actually the bottom seam and can be opened with a little massaging. It’s formed during the manufacturing process and is just the point where the two faces of the bag stick together during the cutting operation. The real seam is located about ¾ inch above the bottom of the bag.
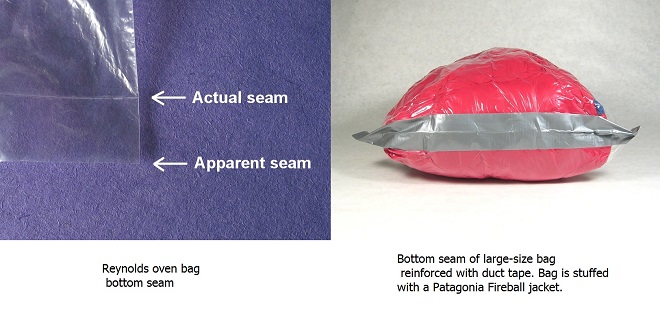
You can reinforce and waterproof this seam in at least a couple of ways. One option is to apply a wrap of duct or 2″ wide clear packaging tape around the seam as shown above. Before applying the tape, however, you’ll want to either turn the bag inside out or cut the excess material at the bottom of the bag to just below the real seam.
Alternatively, the seam can be sealed using McNett’s Seam Grip, but you’ll want to turn the bag inside out before applying this sealer (otherwise, you’d need to seal three seam faces, rather than just one). It also helps to fasten the bag to the tabletop during this process using masking or other easily removed tape (duct or packaging tapes can be very difficult to unstick). After application, allow the Seam Grip to cure for at least 12 hours for the best results. When the sealer is dry, its surfaces will stick tenaciously to one another, so before you remove the hold-down tape, you’ll want to dust the cured adhesive with talcum powder to eliminate the tackiness.
Despite the interesting properties of these bags, I would nevertheless be hesitant to rely upon them as my primary means for protecting critical gear. They are still too easy to puncture for my liking and require seam sealing, which is not always 100% effective. For an ultralighter traveling in a fairly dry environment, however, and especially if supplemented with a pack liner, these bags are probably worthy of consideration.
A Two-Part Dry System
Given the current state of technology and my near-obsession with equipment reliability, I believe that the best strategy for keeping critical gear dry is through a two-part system that uses a combination of lightweight paddle sacks, backed up with “half-pack” liners.
PART ONE: LIGHTWEIGHT PADDLE SACKS
Paddle sacks, as the name implies, were first developed for use in canoes, kayaks and fishing boats. Because they needed to withstand the often serious punishment that accompanies such applications, they’ve traditionally been made either from thick vinyl or from heavily-coated, high-denier nylons. Conventional paddle sacks large enough to carry a backpacker’s critical gear can weigh 12 to 14 ounces or more, making them too heavy for most hikers.
In recent years, however, several companies (see Resources below) have developed lighter weight versions of these bags that are designed primarily for trail use. They’re often made from 70D coated nylons, have seams that are glued and/or taped, and sometimes have bottoms made from Cordura or other abrasion and puncture-resistant fabrics. Most also have roll-top closures that are highly water-resistant (when used properly), are convenient for accessing gear, and work equally well whether a gear bag is full or is partially empty. Rather than 12 or 14 ounces, the sack noted above can now weigh as little as 3 or 4 ounces. I’ve used these types of bags for at least five years and have never had a failure.
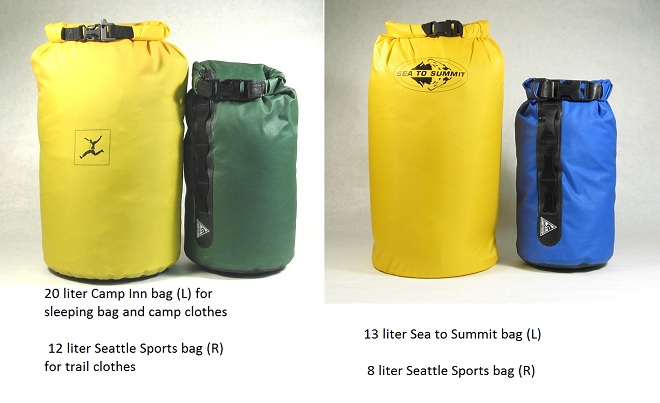
For most trips, especially when traveling at higher elevations or in colder climates, I now employ two of these lightweight sacks to house critical gear. Sack #1 is a 20 liter bag used to protect my down sleeping bag and dry camp clothes and is carried at the bottom of my pack. Sack #2 is a smaller, 8 to 13 liter bag that holds my filled jacket (down or synthetic), fleece hat, gloves, and possibly a 100 weight fleece jacket and is carried near the top of the pack for easy access on the trail. Together, these two bags weigh about 7½ ounces. Two comparably sized silnylon sacks, with sealed seams, would probably weigh about 3 ounces, so the incremental cost for the paddle sacks is about 4½ ounces. It’s a price that I’m happy to pay, however, since the chance of having my gear become saturated on the trail is greatly reduced.
The risk is not completely eliminated, however, especially if the pack becomes submerged. Although the bodies of these paddle sacks are not likely to leak, water can sometimes enter through the rolled tops if they’re not secured tightly enough. That’s why I also use a “half-pack” liner that both backs up the large paddle sack and protects most non-critical gear.
PART TWO: HALF-PACK LINERS
As mentioned above, I tried plastic compactor trash bags on a couple of trips, but was not satisfied with their performance as a primary defense mechanism. When used as a backup, or for protecting non-critical items, however, I think they’re fine. As a result, I have now reverted back to compactor bags that are 2-3 mils thick and that weigh about 2½ ounces. I view these liners largely as disposable and usually replace them at the beginning of every trip. When on the trail, I simply need to remember to inspect them periodically for punctures, patching them quickly with duct tape when holes appear.
I normally place this liner in the bottom of my empty pack’s main compartment, then load paddle sack #1 containing my sleeping bag and camp clothes into it. Next, I add most of the non-critical gear described below, then seal the liner using the candy cane closure and a stout rubber band. At this point, about half the main pack compartment has been consumed. On top of the sealed liner, I finally add two silnylon food bags and paddle sack #2 containing mostly trail clothing (I should also note that this system works well from a weight distribution point of view, at least with the internal frame packs I’ve used in the recent past).
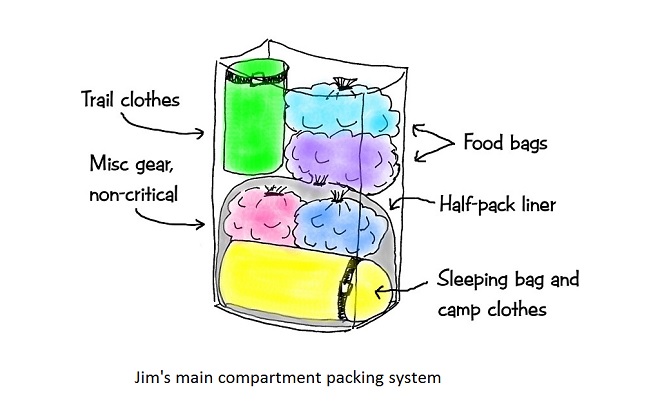
The key advantages of this system are:
– My sleeping bag and camp clothes are double-protected from water absorption. Even if the liner develops an undiscovered puncture or two, it will still keep most of the water away from both sack #1’s roll-top closure and from the non-critical gear it contains.
– The half-pack liner rarely needs to be opened on the trail, so the fact that the candy cane closure is not super-convenient is largely irrelevant.
– I don’t spend extra ounces over-protecting non-critical items.
– Having paddle sack #2 at the top of the pack makes accessing trail clothes quite convenient. It also provides an easily-accessed safe haven for camera gear or other small, water-vulnerable items when conditions warrant. In a high-risk situation (like fording a fairly deep river, for example) I usually re-seal this sack’s closure to make sure it’s tight and/or move it inside the lower liner. Alternatively, I could also carry an extra seam-sealed oven bag (at about ½ ounce) specifically to encapsulate this bag under these conditions.
– The paddle sacks and liner can be removed from the pack to protect gear in camp.
– Likewise in camp, the liner can be used to temporarily store wet clothes or it can cover your empty pack when it’s stored outside of your shelter at night. It can also serve as a “washing machine” for doing laundry, or it can even be used to protect the bottom three feet or so of a sleeping bag when using an open tarp in the rain (or if your tent should develop a leak). For this last use, even though the liner is not breathable, its loose fit will normally permit moisture to escape from the air space around the sleeping bag.
Aside from their value as handy in-camp “utility players”, liners are also easy to justify from a weight perspective on the trail, at least if a pack should become soaked during the course of any given trip. That’s because the weight of the water that would probably be absorbed by the otherwise unprotected gear inside the pack would almost certainly exceed the small weight of the liner. I suppose that the same argument could be made for the pack covers that I mostly dismiss above, but at weights of 6 or 8 ounces (with seams sealed), the math becomes less appealing.
General-purpose trash compactor bags, with dimensions of approximately 24″ x 36″ make good pack liners, in part because their size is about right for the application, and in part because they’re thicker than most other plastic bags, which enhances durability. Most brands are also either white or clear, which allows more light to enter the pack than do dark-colored bags, making packing and accessing gear easier. My favorite type is currently the Safeway store brand, which is 2½ mils thick and currently costs $3.79 for 10 bags. Hefty brand bags are similar in size and weight.
Trash compactor bags can sometimes be difficult to find in retail stores, however, so it may be necessary to purchase them online from sources such as Bell Parts or Gillroy’s. As an alternative, clear poly bags of almost any size can be ordered from suppliers such as Associated Bag, Universal Plastic, or Hillas Packaging. The only catch is that it’s usually necessary to order in large quantities, so you’ll probably end up with a lifetime supply.
NON-CRITICAL GEAR
Gear that I refer to as “non-critical” either won’t be damaged by water or is already packed in smaller waterproof sacks (mostly Ziploc freezer bags). My equipment is usually modularized into “kits” (first aid kit, utility kit, personal kit, hygiene kit, kitchen kit, etc) in order to help keep it organized. Most of these kits are, in turn, loaded into one or two ultralight stuff sacks that may or may not be water-resistant. It is primarily these items that end up inside the compactor bag.
My food, unless I’m traveling somewhere that mandates the use of bear canisters, is usually carried in a pair of 16″x21″ silnylon sacks that can be easily hung from trees using the counterbalance method. My tent is usually carried in a semi-waterproof stuff sack strapped to the bottom of the pack, my sleeping pad is on the outside of the pack in a water-resistant “utility shed” bag, and shell clothing is carried in the pack’s top compartment, usually in large Ziploc or aLoksak bags.
Other Notes
DAMP CLOTHING
One trick I’ll mention at this point involves damp clothing. If you want to remove a piece of clothing on the trail that’s become only slightly wet, either from external moisture or from perspiration, you probably won’t want to return it to the same bag as your filled jacket and other dry trail clothes (sack #2 above). On the other hand, you’ll probably also want to keep it from getting even wetter, so just placing it inside a soggy pack is not a good idea either. So instead, I normally store damp clothing in one of the two silnylon food bags under these conditions. These bags won’t provide protection against immersion, but even in the worst case, the item often stored here (the 100 weight fleece jacket), will typically dry fairly quickly even if it becomes soaked. Except for the submersion hazard, however, these food sacks offer fairly good protection for such items. Alternatively, of course, one could carry a small, separate waterproof bag for damp clothing.
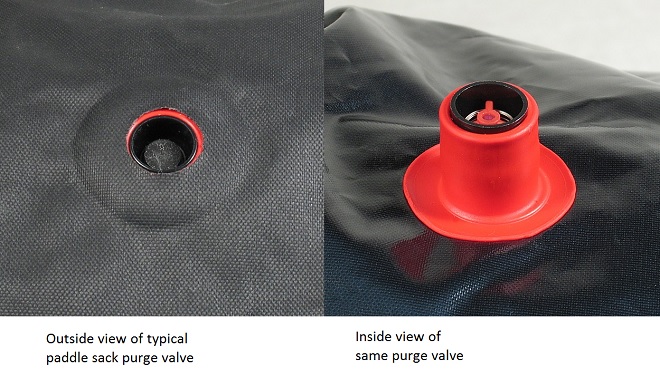
PURGE VALVES
Some lightweight paddle bags include one-way purge valves that allow excess air to be pushed from these sacks, but still keep water out. While this feature sounds good in theory, it doesn’t work very well with the kinds of things that backpackers are most likely to store in these sacks. What happens with sleeping bags and puffy jackets is that they create air pockets when stuffed into these bags as their own fabric presses against the sides of the sacks. Likewise, these items also tend to form seals around purge valves, effectively blocking air access. As a result, purge valves usually just add weight, complexity and potential leakage points and are therefore not recommended for most backpacking applications.
PADDLE SACK TECHNIQUES
Sometimes even a high-quality paddle sack can allow water to reach the sack’s contents. The problem is rarely with the fabric or seams, but instead is usually the result of a faulty closure. The primary key to keeping these sacks highly waterproof is to make certain that closures are tight.
When sealing a sack of the style that uses a single side-release buckle at the top edge (i.e., most paddle sacks), first push as much air as possible out of the bag. Then, carefully align the two sides of the top lip, which probably contains either a single or a double sewn-in stiffener. Next, fold the top of the bag over the stiffener at least three or four times, trying to keep the fabric flat and wrinkle-free. Continue folding until you think you can’t go any further, then fold the top one more time and fasten the buckle. Either the contents of the sack and/or the air pressure inside the sack should now be exerting enough force on the closure to enable it to maintain a tight seal.
Even this closure probably won’t be perfect, however, which can be a good thing if you’re changing elevations to any significant degree over the course of your day. A bag sealed, for example, at 5,000 feet elevation could become much like an over-inflated balloon at 10,000 feet, possibly bursting if some of the air inside wasn’t allowed to escape. That’s never happened to me, however, probably because enough air leaked out through the roll-tops that pressures could be equalized.
COMPRESSION SACKS
Many of the same companies that sell paddle bags also sell compression sacks, which allow a hiker to squeeze the load down even further than normal. These sacks typically employ heavier fabrics and multiple straps, usually attached with side-release buckles, to compress their contents. Unless you’re carrying a very low volume pack and can’t get your gear in any other way, I think that compression sacks are generally a bad idea. They add a fair amount of weight, but more importantly, can damage expensive sleeping bags and puffy jackets.
The kinds of items you need to protect most usually provide warmth through the lofting of either natural fill materials such as goose down, or synthetic fibers such as Polarguard or PrimaLoft. The ability of any of these fills to keep you warm can decrease quickly if they’re over-compressed, since they lose part of their ability to “puff up”. Synthetics are usually damaged most quickly, but even high-quality down, though generally more resilient than synthetics, can become permanently “squished” with too much compression.
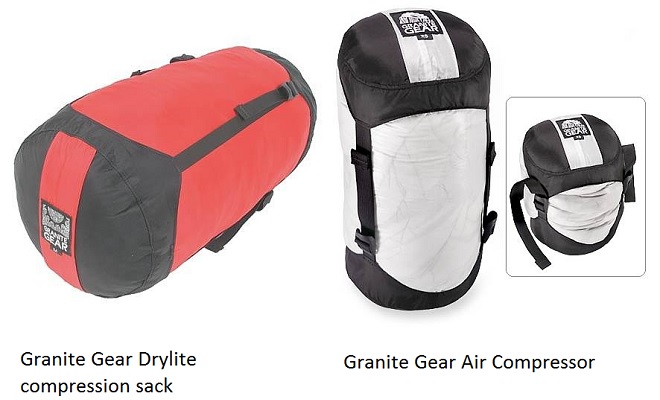
The paddle sacks recommended here already provide a measure of compression for sleeping bags and filled clothing. In fact, if you’re particularly sensitive to this issue, or if you routinely use synthetic filled gear, you may want to use slightly larger sacks than those mentioned above. So rather than a 20 liter size for your sleeping bag and dry camp clothes, you might want to use a 30 or 35 liter sack, which usually weighs only slightly more.
PERSPIRATION AND HUMIDITY
Two other potential sources of moisture that can be absorbed by critical gear are perspiration and humidity. Though neither is likely to create problems as serious as those caused by rain, snow or submersions, each can nonetheless reduce the ability of insulated clothing and sleeping bags to keep you warm. Though a detailed discussion of these problems is beyond the scope of this article, I will include a few brief comments:
– When hiking in cold weather, be careful not to overdress. If you’re perspiring heavily into a jacket, take it off and replace it with a lighter piece if possible. Damp clothing should, as noted above, be stored in such a way that it doesn’t get even wetter.
– Even at night, your body continues to perspire, often imperceptively. A down sleeping bag, it is said, can absorb up to a pint of moisture during a single night, so it’s important to air your sleeping bag every morning if possible. If the bag is opened so that the inside is exposed to the maximum airflow, much of the accumulated moisture will evaporate fairly quickly, even under chilly or cloudy conditions.
– If you’re camping in very cold weather, where moisture that collects in a sleeping bag won’t evaporate (or might even freeze inside the bag), the use of a vapor barrier, such as the one sold by Western Mountaineering is highly recommended. Such a liner will keep you warmer, since it helps prevent evaporative heat loss, and will also keep the insulation from degrading.
– High humidity levels can sometimes induce insulated gear to absorb moisture, though rarely with notable consequences. While affected gear might feel clammy, even down garments and sleeping bags usually won’t lose a substantial amount of loft from humidity absorption alone. Some people worry a lot about down’s capacity to absorb water, but as Chris Townsend writes in the third edition of The Backpacker’s Handbook: “…keeping down dry need not be difficult or a chore and it’s harder to get down wet than many people think. I use down bags most of the time, including in wet places, and I haven’t yet had one get more than a little damp. Packing a down bag in a waterproof stuff sack and sleeping in a tent or under a tarp when it rains are the best ways to keep it dry.”
MAINTENANCE
Even though a paddle sack may start out waterproof, its performance can deteriorate with use, so it’s important to check your bags periodically for leaks. As noted above, probably the best way to test gear sacks is to turn them inside out, then fill them with water. Minor cracks in polyurethane coatings can usually be repaired with an adhesive such as McNett’s Seam Grip.
Punctures that occur in the field, though fairly rare with nylon paddle sacks, can often be temporarily repaired with duct tape. Unfortunately, duct tape won’t stick to silnylon bags, so you’d need to carry a tube of SilNet, and perhaps a needle and thread and/or an extra piece of silnylon if you wanted to repair these bags on the trail.
NEW DEVELOPMENTS
Last year, DuPont introduced a silicone impregnated Cordura fabric that is said to be both stronger and lighter than standard weight silnylon. This new fabric is now being used by companies such as Granite Gear in a line of ultralight stuff sacks that I’m now testing. Preliminary results suggest that its water resistance is about the same as standard silnylon, though the fabric does appear to be a little less “stretchy”, so it may be slightly better suited to gear sack construction.
Sea to Summit, an Australian company, is also using Sil Cordura in a new line of ultralight gear sacks. Perhaps even more noteworthy, they have found a way to add a thin polyurethane coating to the inside surface of the silicone impregnated fabric that is said to improve the water resistance of the fabric over standard weight silnylon. The PU coating also allows the seams to be factory taped.
The new line of “Ultra-Sil” sacks are also the first commercially-produced silicone impregnated bags that I’m aware of to offer a roll-top, paddle-style closure (previously, as far as I know, only my own silnylon sacks incorporated this feature). All of this at an average weight of less than half of their already lightweight sacks. A 20 liter version of this new sack, for example, weighs only 1.8 oz versus 4.2 oz for their older sack. Likewise, a 13 liter version of the new sack weighs only 1.4 oz versus 3.7 oz for their old sack (See Ultra-Sil update below).
Outdoor Research has also updated their line of dry bags with the recent introduction of the HydroLite and Hydroseal sacks. While both offer roll-top closures and taped seams, the Hydroseals seem to use slightly heavier fabrics and coatings and include daisy chain webbing for lashing purposes. Both bags, however, are still very light, with the HydroLites weighing in at not much more than the new Sea to Summit Sil Cordura bags.
ULTRA-SIL UPDATE, May 2006
I recently tested one of the new Sea to Summit Ultra-Sil sacks, an 8-liter model purchased from a local REI store. The good news is that the advertised weight of 1.1 ounces was dead-on, at least according to my scale. The bad news is that the new polyurethane coating seems to have added little incremental water resistance to the fabric over standard weight silnylon / Sil Cordura. When the bag was turned inside out (to simulate real world conditions) and filled about 2/3 with water, the bag leaked extensively, especially through the bottom panel (see picture below).
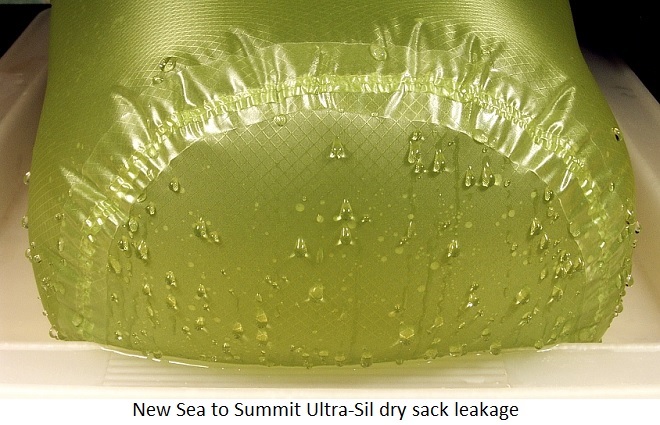
It was difficult to determine if there was also leakage around the seam tape, but I suppose it really didn’t matter since the fabric leakage was so substantial. Hoping to shave a few more ounces of pack weight with these bags, my test results were disappointing, especially knowing that the stresses of real-world trail usage would probably induce even greater leakage in the future.
My current take on the Ultra-Sils is that even though some preliminary reviews by others have been favorable, I would not entrust critical gear to these bags. For a couple of additional ounces, it’s possible to get a much more substantial sack that has welded seams (versus the sewn and taped seams in the Ultra-Sils) and better waterproof fabric coatings. The Camp Inn sacks discussed herein are still among my favorites since they offer excellent protection at reasonable weights. I should also note that I returned my test Ultra-Sil sack to REI along with a copy of the picture above, predicting that they would probably see a high rate of customer returns on this product.
Resources
While there are several companies that offer paddle sacks designed for marine sports, most of their products are too heavy (in my opinion) for trail use. The following companies currently offer lighter weight versions of these sacks that I believe are more attractive for backpackers:
Sea to Summit offers two lines of lightweight paddle sacks, including the new Sil Cordura models mentioned above.
Outdoor Research has now added lightweight, roll-top sacks to its lineup.
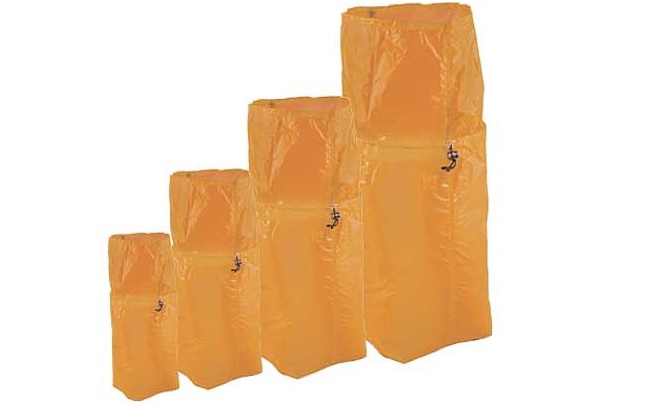
Camp Inn offers lightweight nylon gear sacks that I’ve used with good success. Their model # 7912 is a great size (about 20 liters) for a sleeping bag and camp clothes and weighs 4.5 ounces. They’re available at a number of retail outlets nationwide.
Granite Gear offers a lightweight dry sack that features dual latch straps.
Montbell America sells two lines of paddle sacks. One is fairly heavy and is designed for use primarily in water sports. The other, however (the “Protection Aquapel” series), includes four bags that weigh from 2 to 5 ounces, lightweight enough for trail use. (Thanks to “WildMan” from the Lightweight Backpacker forum for the alert about these bags).
Seattle Sports offers the Cyclone Round Camp Sack, which in the 20 liter version is a bit heavy at 6.9 ounces. It includes, however, a daisy chain for lashing, as well as an autopurge valve that some may like. I currently have several of their older Camper Hydro sacks, which lacked the valve, are slightly lighter and were available in more sizes, but which have been dropped from their current lineup.