Carry Awards
 Insights
 Liking
 Projects
 Interviews
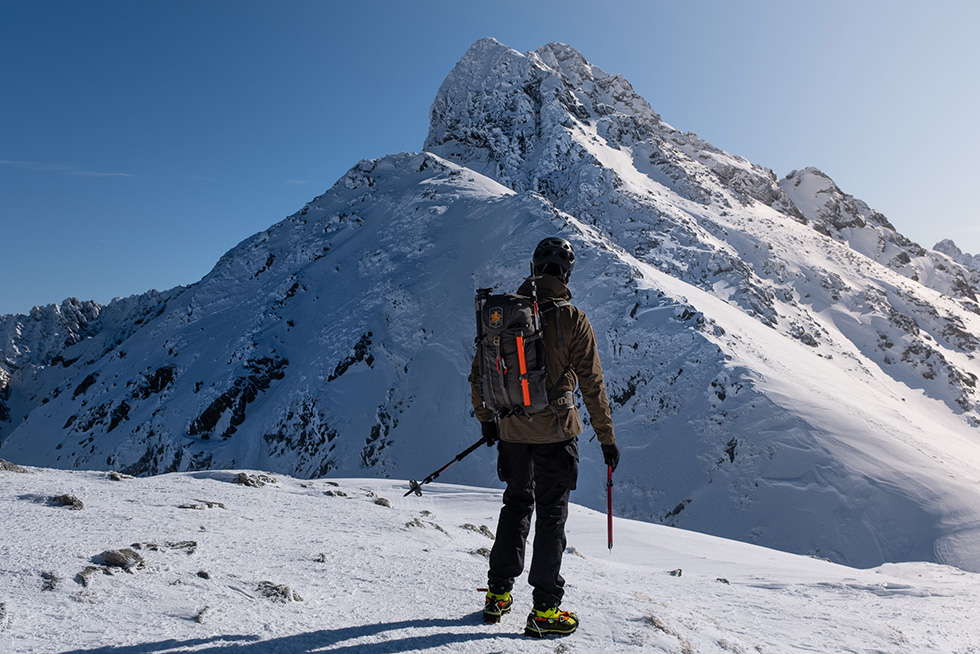
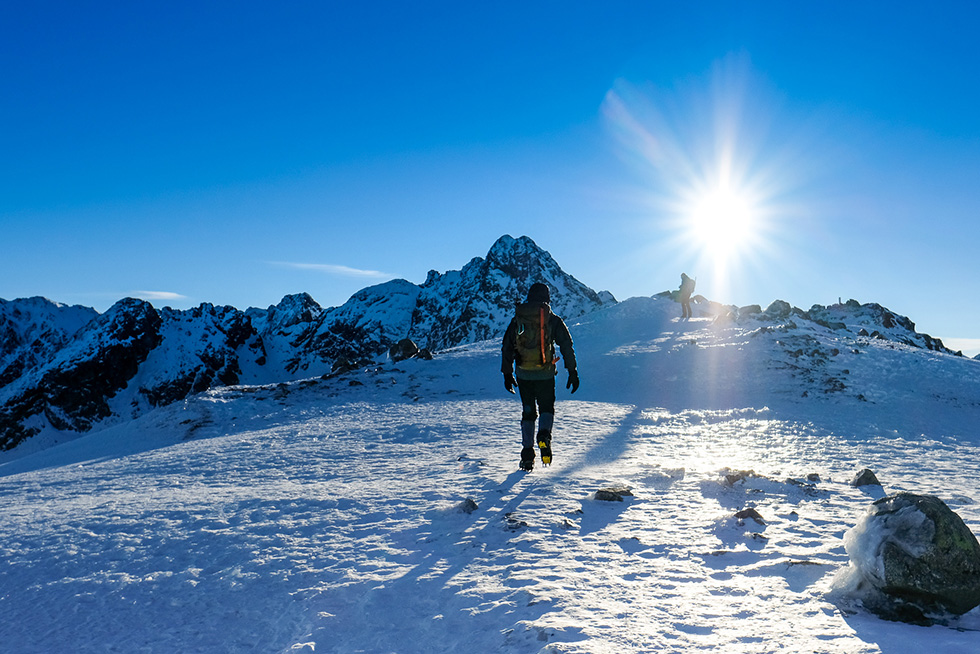
Beginner’s Guide to Winter Mountaineering
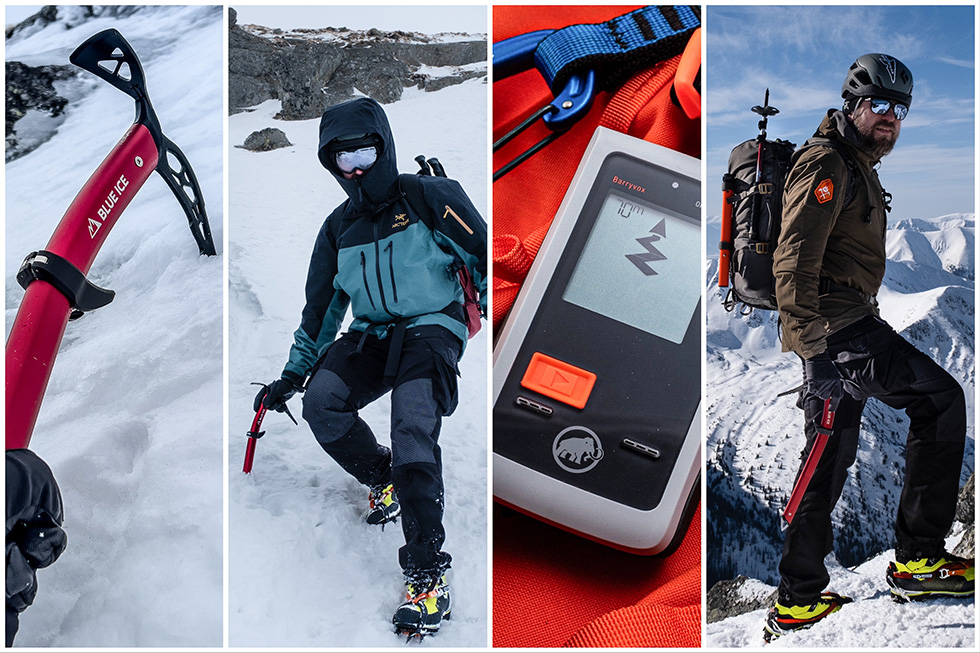
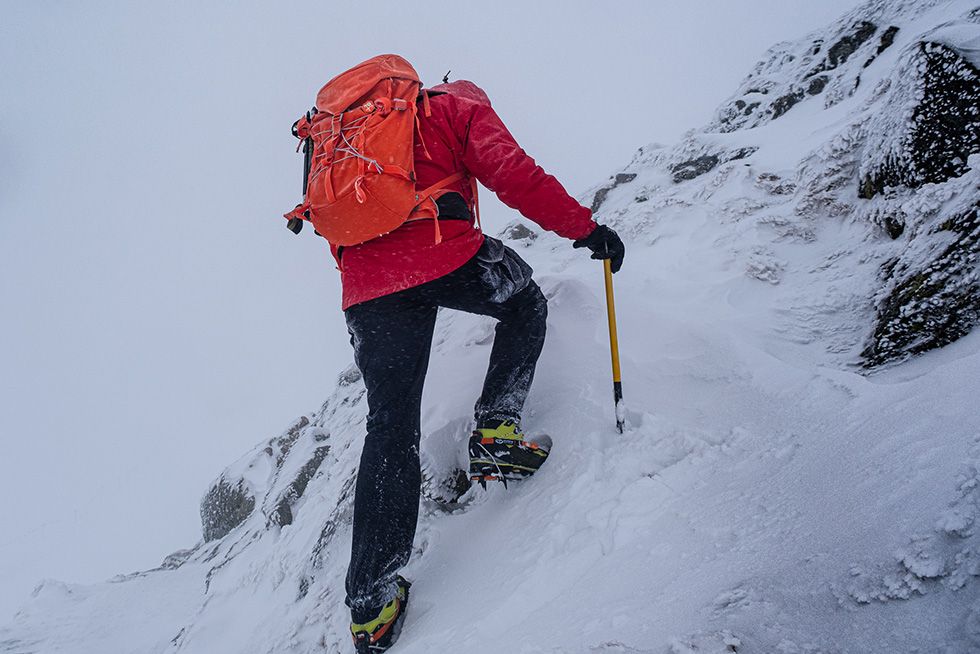
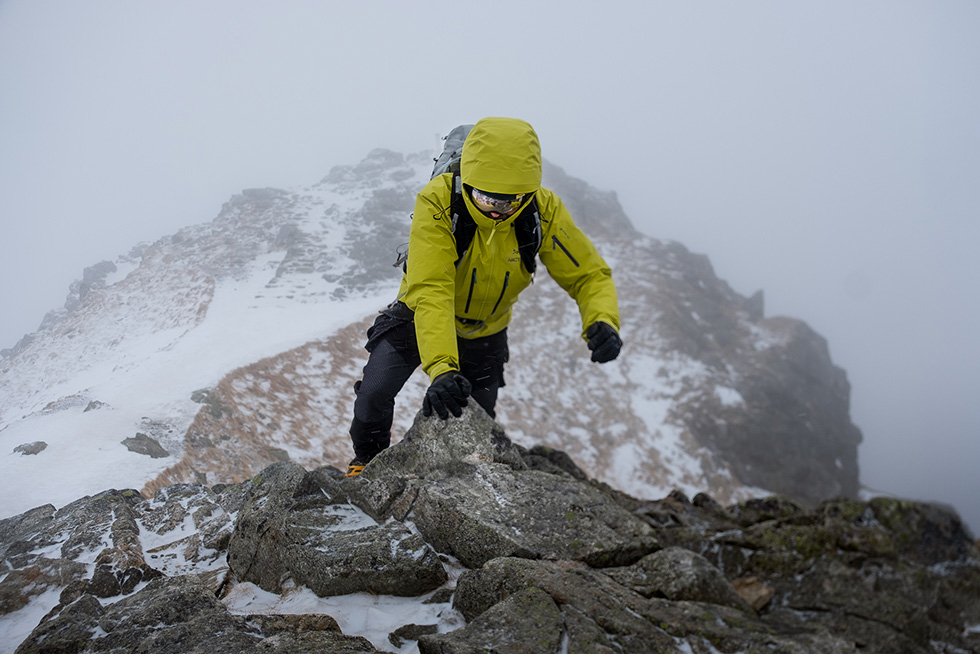
Winter mountaineering is one of the most exciting and adventurous outdoor experiences. But it also requires good preparation in terms of equipment and ability to use it. So here’s my shortlist of winter mountaineering gear essentials “by category” to start a cold-season mountain adventure. I’ll also include some hints and explanations regarding my choices. Enjoy the read, and stay safe when climbing ice and snow.
Some items are obvious, or there is a lot of info about them, even here at Carryology. Like the basic layering system, which you adjust depending on weather conditions and your preferences. I usually wear a Merino base, softshell pants, light synthetic active insulation, and a softshell. But the rest is more challenging.
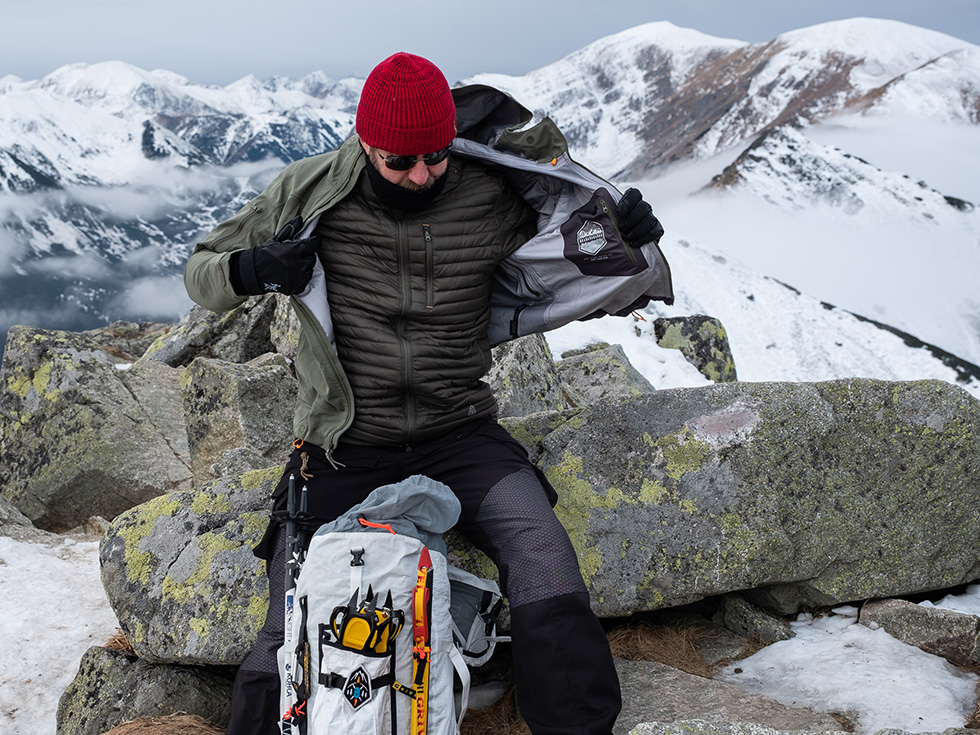
Hardshell Jacket
The single role of a hardshell is to protect you from the elements, especially snow and rain. A good hardshell will keep you dry – not only from the water pouring on you but also from sweat, by evaporating it from your layering system to the outside. So, a quality membrane is the foundation of a good mountaineering hardshell.
But before we dive in, it’s also vital to understand a hardshell’s limits – yes, it’s a breathable jacket, but still a far cry from softshell breathability. So, I don’t recommend a hardshell for high-intensity activities if the weather allows for a softshell option. Still, you should always keep a hardshell in your backpack as an emergency jacket, which can save the day (or even your life) if the weather goes south. I divided this category into a 4-season all-around hardshell jacket and a dedicated winter one. There are pros and cons of each option.
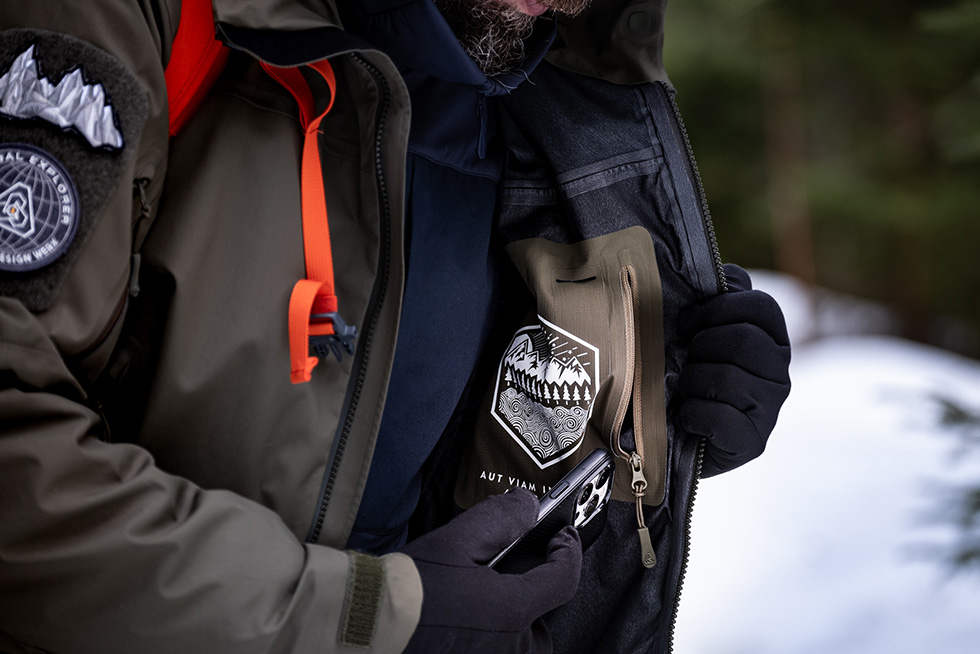
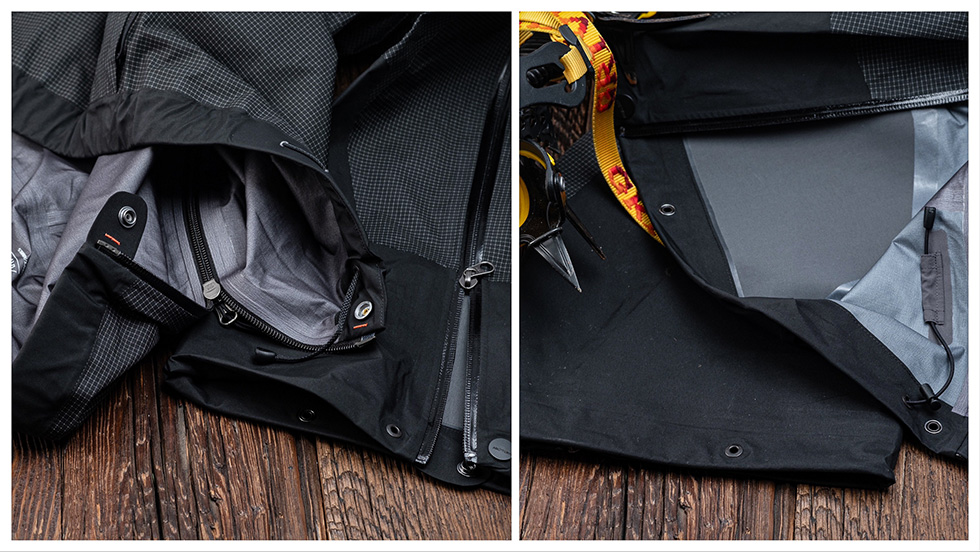
So let’s start with a winter-ready hardshell from Prometheus Design Werx (PDW), the Aegis LT Hoodie, which is a versatile all-season shell. It’s waterproof and breathable with a classic ePTFE membrane. It has all the features I require in a hardshell: backpack-compatible chest pockets, venting pit zips, extra-long sleeves, multiple cord adjustments, and waterproof YKK zippers. Plus, an internal chest pocket for small valuables.
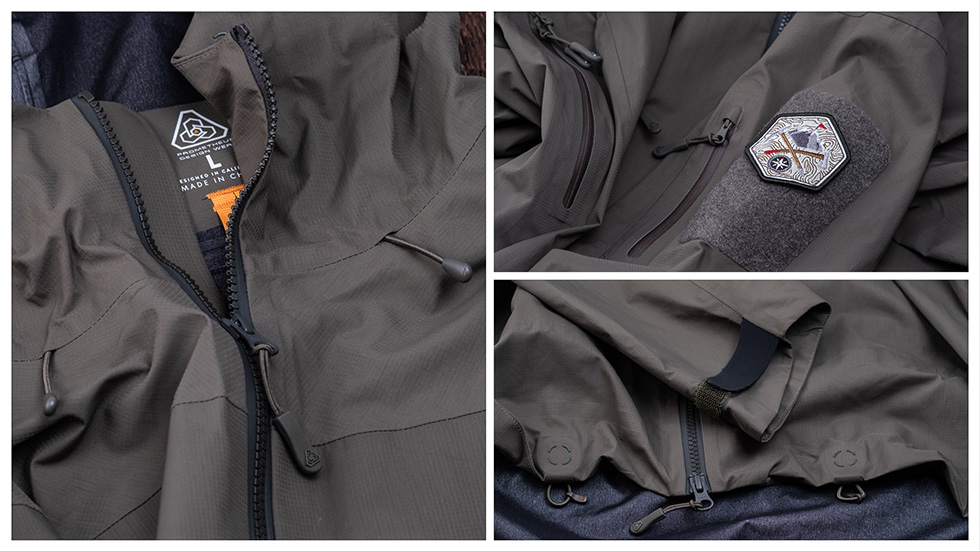
However, two additional characteristics make the Aegis a true 4-season winter-ready hardshell. The first is a relaxed cut – the Aegis has enough space for winter layering without the need to size up (which is never a good idea, as the overall fit is usually compromised). I could easily wear my Stratus down jacket under it. Most lightweight 3-season hardshells have an athletic cut optimized for summer and early fall – good luck fitting winter insulation underneath. The second critical point is the helmet-compatible hood.
Compared to dedicated heavy-duty winter shells, the Aegis LT is softer (40D ripstop fabric) and less restrictive for movement. The polyester inner liner ensures next-to-skin comfort and a good wicking effect in summer use. Such a single shell is also a budget-friendly solution, as you can use one hardshell for all your adventures through all seasons.
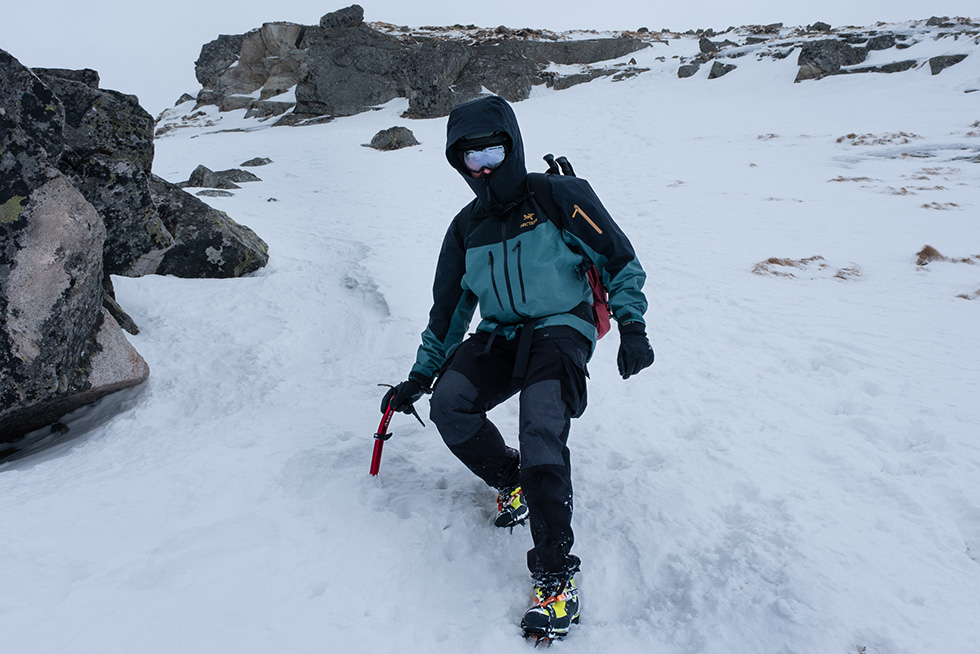
So why would one want a dedicated winter hardshell? When you go into hardcore rocky and icy terrain, especially on freezing days, or expect severe blizzards on the ridge, you need true winter weather armor. Something extraordinarily durable, resistant to cuts and tears. A classic example is the newest iteration of the legendary Arc’teryx Alpha SV – I’ve been using two previous generations for years. It’s the toughest specimen in a hardshell world, made of Gore-Tex Pro Most Durable membrane laminated to rigid N100D outer material. It’s a beast, but sometimes that’s exactly what you need.
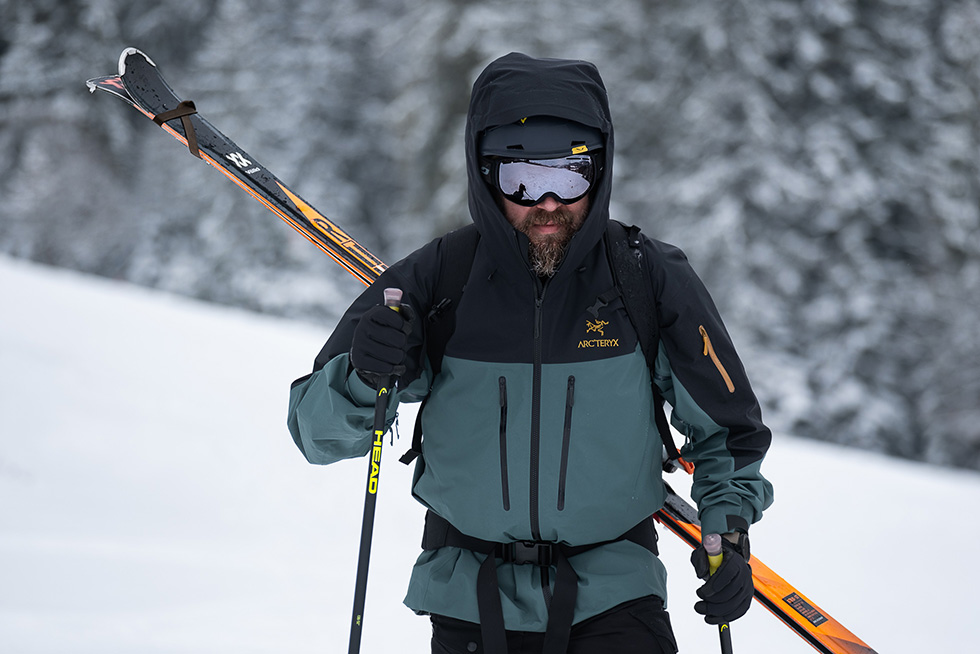
This jacket is also very roomy for layering, and the hood is fully helmet-compatible. The sleeves are extra long, so when reaching up while scrambling, your forearms always stay covered. The Alpha SV has multiple pockets, including an inside chest pocket on one side and an inner mesh sleeve on the other (great for storing beanies or glove liners). All zippers are YKK AquaGuard.
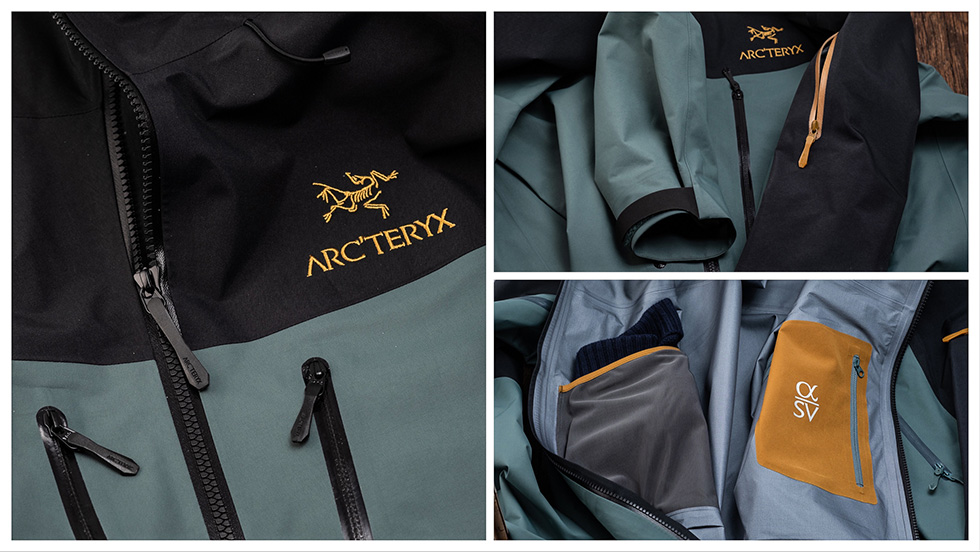
Naturally, the laws of physics still apply – breathability won’t be as good as on thinner and lighter “most breathable” Gore-Tex fabric. But in return, the Alpha SV can survive almost everything that severe winter weather can throw at you, including icy blizzards, frequent contact with sharp edges of icy rocks, etc. It will even survive the occasional encounter with an ice axe’s pick. The Alpha SV is a terminator of the jacket world – made for icy vertical routes and the most demanding winter weather when snow is not falling but blows sideways at high speed. The SV has always been my trustworthy winter mountaineering companion.
So what are the downsides? Well, not only is it expensive (no-compromise products always are), but it also can’t be your only shell. This thick and stiff winter armor is not sufficiently suited for warmer seasons – for summer or fall, you need something thinner, more breathable, and a better next-to-skin feeling.
Hardshell Pants
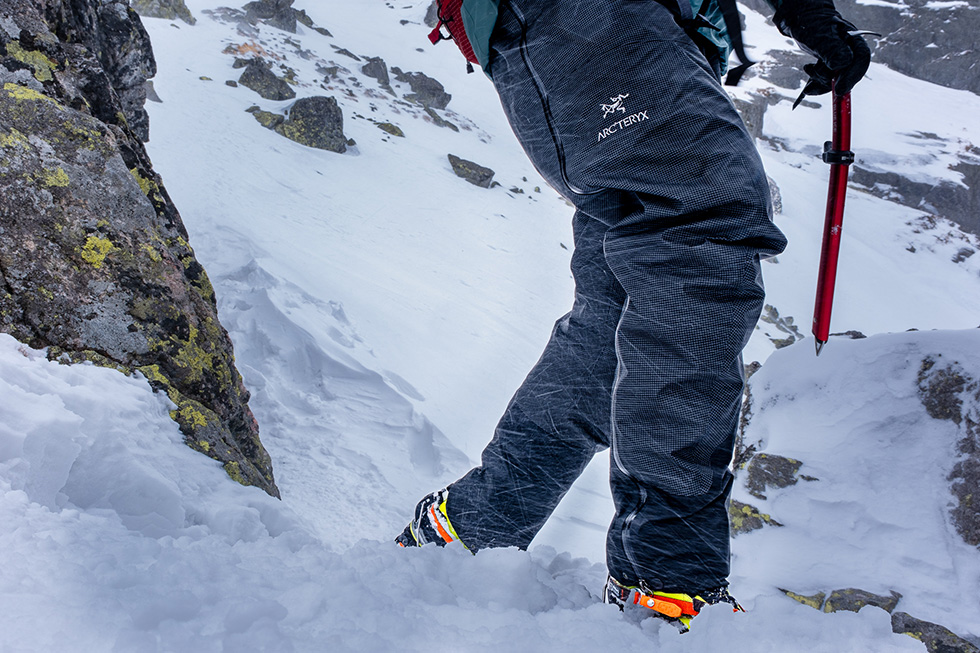
In most cases, all you need are breathable softshell pants. But if the weather goes wild, having a waterproof option in your emergency arsenal is golden. That’s why I prefer quick-on pants made of thin 3L shell fabric. This season, my most used Gore-Tex pant is the Arc’teryc Alpha Pant. The key feature is a system that allows me to put the pants on fast and efficiently: the full side zippers, security snaps on both sides, and a quick-draw string in the waist. The fit is relaxed enough to put it on top of any softshell pant, including my old but super robust Arc’teryx LEAF Combat Pants II. The Alpha Pant will even fit around heavy winter boots.
Again, it’s just an emergency garment, not something I’d wear all day. This year, it protected me from heavy blizzards several times, and I could put it on within two minutes in the wind and while wearing gloves. Just practice two to three times at home; don’t start reading the manual when the conditions go bad, and you’re stuck on a snowy wall.
Emergency Insulation
I can’t stress this enough – in the mountains, be prepared for any scenario. Even if you think you’re warm enough, putting one extra piece of insulation in your pack is a good move – either for an emergency or a static hike phase. Do you think that a scenario of an emergency overnight camp is not realistic? There are multiple cases each season in the Alps, Tatras, Rockies, and many other mountains – so it’s better to be ready than sorry.
Ideally, it should be lightweight, compress well, and add considerable warmth to your layering system. You should also be able to put it on top of your base and active insulation. Nothing beats down for this; synthetics are good, but they don’t compress well and are usually heavier. A cut that is not too athletic is key, so you can easily put it on even when hypothermia starts to hit and your mobility is jeopardized. My choice for the last couple of seasons has been the PDW Stratus Down Hoodie. I reviewed it here in 2022 but it’s still my #1 choice for a down jacket. And if you prefer synthetic insulation, the Arc’teryx Nuclei Hoody would be a great option too.
Avalanche Gear
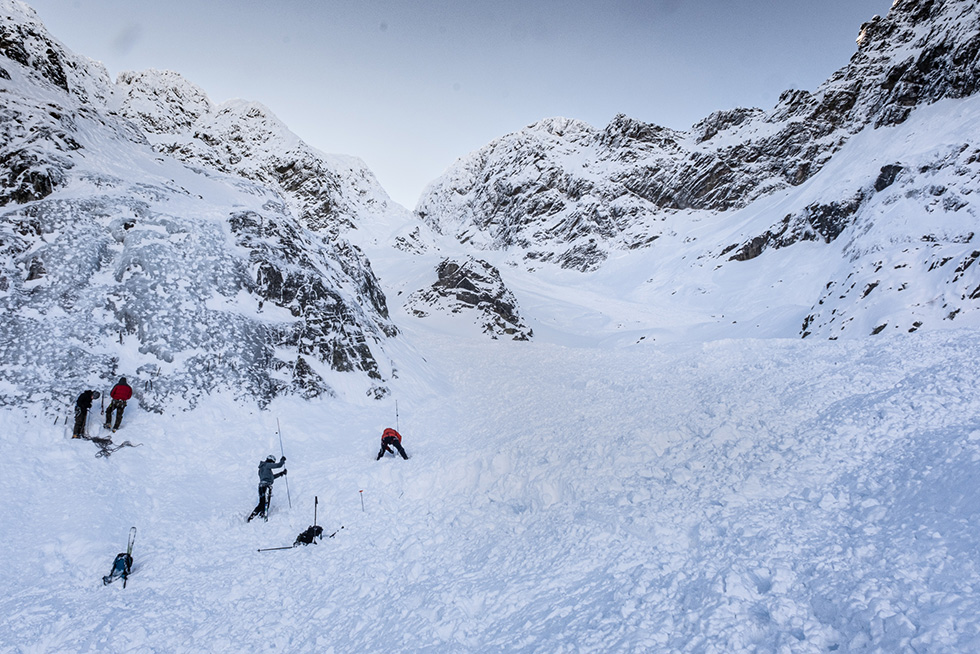
This topic is often just touched on but rarely sufficiently explored and explained in detail. To make better and more conscious gear decisions, you should know not just WHAT you need but also WHY. There are three components in the avalanche kit: transceiver, probe, and shovel – together often called Avalanche ABC. The good news is that you can easily rent it locally in the resort. So, there’s no excuse not to be equipped with an avalanche rescue kit.
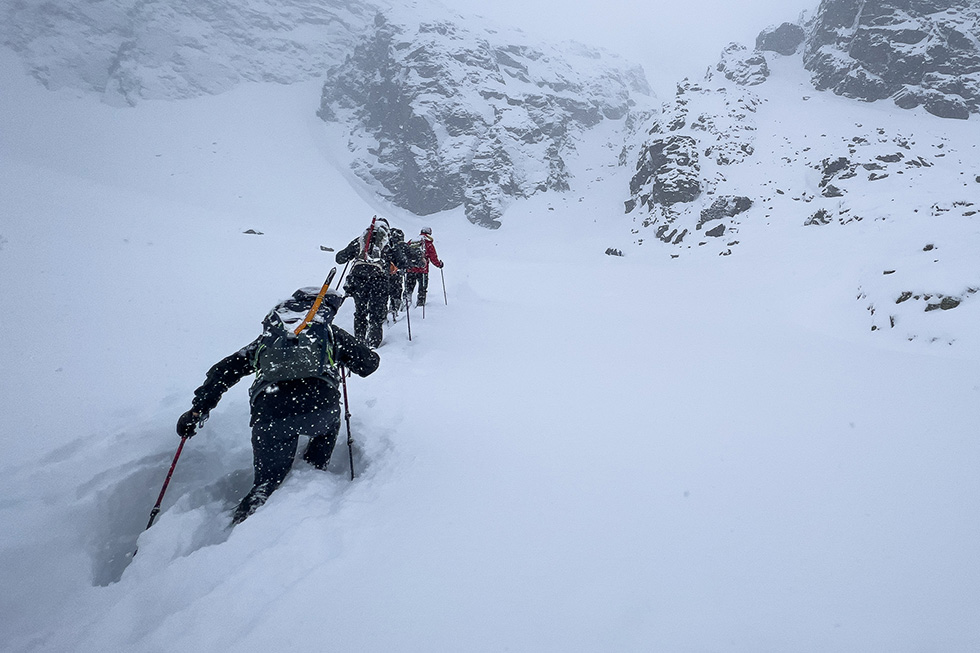
You can minimize avalanche danger by checking local alerts and “reading snow” but it’s never zero. That’s why you should avoid mountaineering alone, especially in the winter. Go in a group, and keep a 50-100m distance when crossing avalanche terrain. In the most avalanche-exposed areas, unbuckle the waist and sternum straps of the pack, remove trekking pole straps from wrists, and increase distance even more. And everyone must be equipped with a complete avalanche rescue kit and should know how to use it in case an avalanche sweeps someone away.

So let’s start with common RECCO – yes, it’s better than nothing, but it has serious limitations. It’s a passive device (you carry just a reflector), requiring an active RECCO search unit emitting radio-specific frequency. Then, the RECCO reflector bounces it back, and it can be detected. But the RECCO transceiver is big, expensive ($5-6k at least), and available only to professional rescue services. This means the rescue team has to arrive on the scene and start searching (either on skis with a handheld unit or using a helicopter), which usually takes time. The first 15 to 18 minutes after the avalanche is vital as it gives a 90% chance of survival; after 35 minutes, it’s just 25% and drops every minute. Even in a well-equipped resort, don’t expect the rescue unit to arrive faster – and only if the weather is good enough to fly a helicopter. So if you think RECCO will save you… well, I’d not count on that.
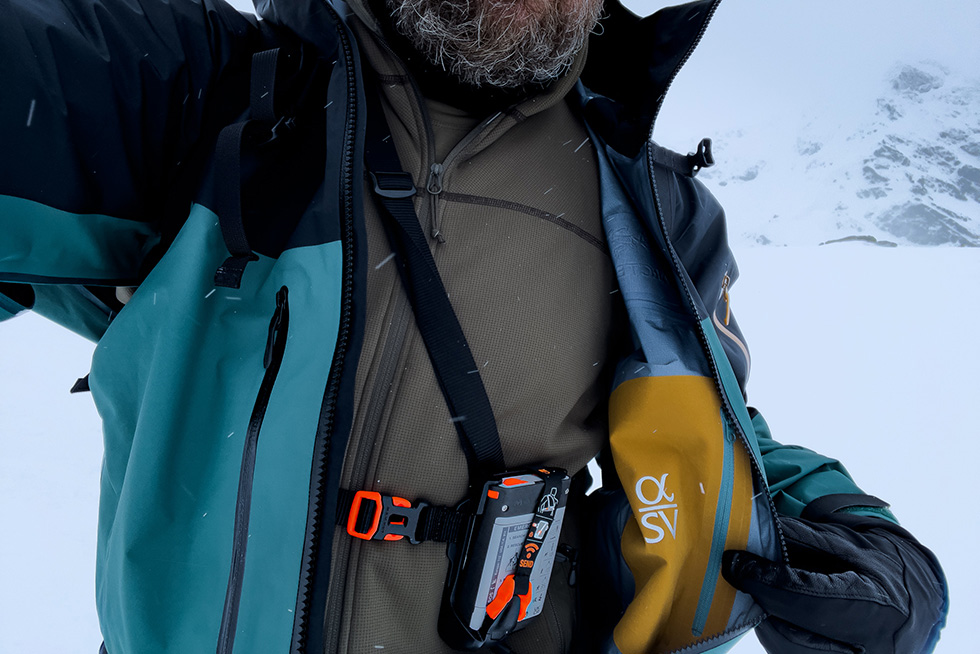
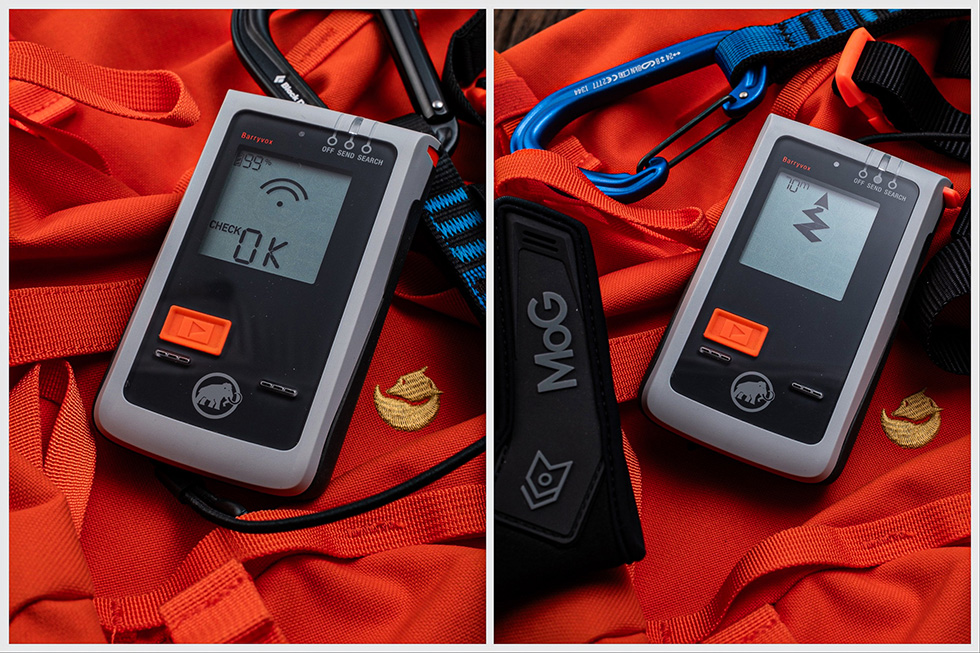
A certified avalanche transceiver (LVS) is the only item that can get you located under the snow. I tried three different units in the last few years, but my favorite is the Swiss-made Mammut Barryvox. The avalanche transceiver operates in two modes: emitter (beacon) or receiver (search mode). It’s super easy to use – switch it on, check the battery level, do a group test (to make sure it’s working correctly), and secure it on your body in the special harness, which is always in the kit. NEVER put your transceiver in a jacket pocket or, even worse, in your pack. You should always put it under your top layer to protect it from snow and frost (for better battery efficiency). Also, an avalanche can’t easily rip it off your body when worn like this. Some mountaineering and ski touring pants have a dedicated beacon zipper pocket, which is also a good spot for LVS.
Each transceiver can be used in a “search” mode to locate the beacons under the snow. Modern 3-antenna units can simultaneously show the direction and distance of the beacon. They can flag individual units to avoid double-searching for one beacon by multiple searchers. Operating a transceiver is intuitive, but get familiar with it at home. In a real-life scenario, you’ll be under stress and time pressure; there are better times to study a user’s manual.
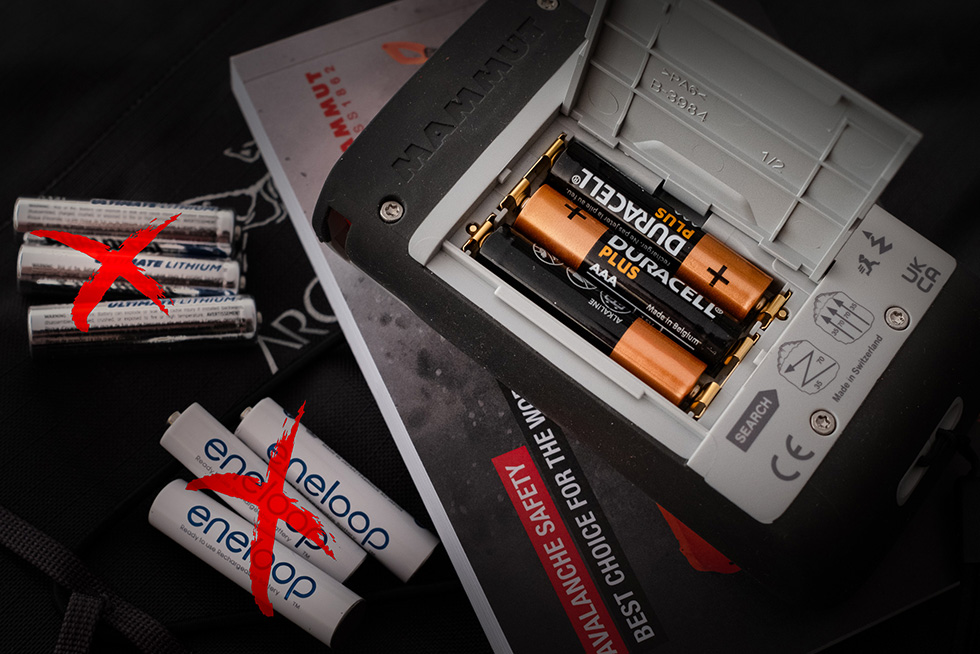
Now listen to what I’ve heard about batteries from a mountain rescue guy. If the manual says to use only alkaline batteries – use just alkalines. But lithiums are better for cold-weather use, right? NOT in this case, and sadly, no user manual explains this phenomenon. First of all, the transceiver on your body under the outer shell is closer to 20 degrees C, not in sub-zero. But most importantly, the discharge characteristic for lithium batteries is almost flat, which means the batteries maintain almost full power till the very end of life. And that’s the catch – there’s NO WAY the transceiver can reliably test lithium batteries when you turn on your beacon.
Checking alkaline batteries is easy and precise, so you know it’s time to change the cells if the self-test shows 40% or below. The same test on lithium batteries can easily indicate almost full batteries, while they could maintain only 10% to 15% of energy and die suddenly during your hike. Even models compatible with lithium cells don’t check them; instead, they calculate the total working hours with an estimated 400 hours as 100% per one new lithium battery set. If you change the batteries, it even asks if it’s a fresh set or the same one that has been re-installed, and it does the math. So go alkaline; just remember to remove them after the season to avoid leakage damage. And under no circumstances should modern rechargeable batteries be used – they contain electronics inside and can interfere with sensitive antennas in the device or even totally jam it.
Of course, there are more manufacturers than just Mammut; two other well-known options are Pieps and Ortovox. Oh, and go with a simple model; don’t complicate things if you’re not a rescue team member or guide who is responsible for a group of people. Advanced models usually allow for easier flagging of multiple signals and are better for group search coordination. And that’s probably not what you do for a living.
When the sufferer is pre-located with a transceiver, it’s time to deploy an avalanche probe and start searching. I’ve been carrying a Mammut Probe 240 for the last three seasons and even used it once on an actual avalanche field. An avalanche hit there about 15 minutes before I arrived on the scene; no one was hurt this time, and all ended well – except some packs and skis lost under a 2m layer of hardened snow. That was an eye-opening experience too.
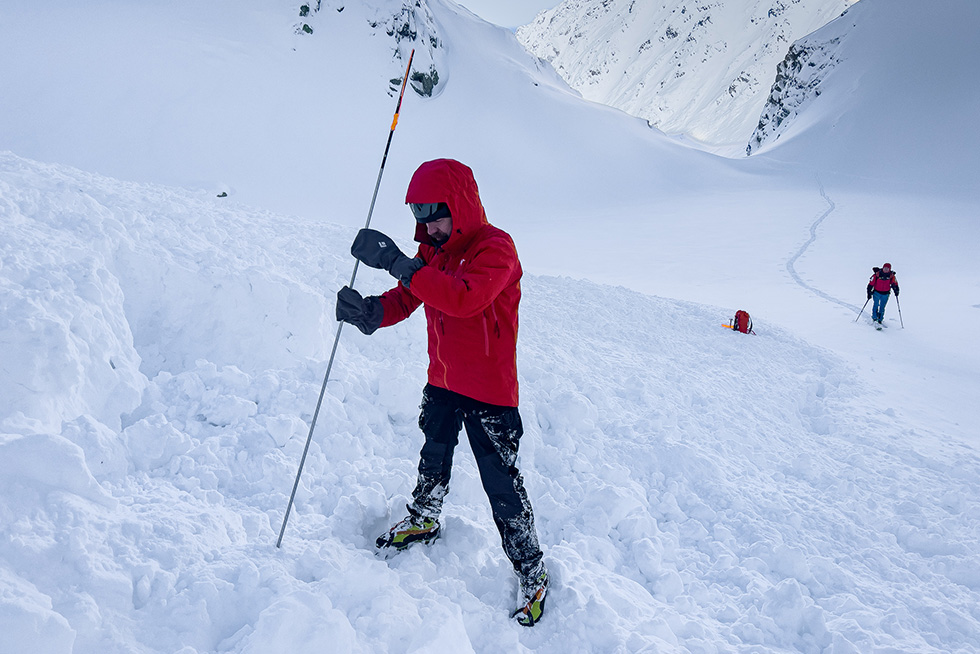
An ultralight carbon probe is nice but also easy to crack inside the pack with an avalanche shovel or shatter when you step on it in crampons by accident. I use an aluminum probe as it’s much more durable, and the 50-70g weight difference is not noticeable. BTW, if 50g or even 500g makes a difference in your efficiency in the mountains – it may be time to visit a gym more frequently. In most cases, a classic 240cm model is long enough. If the layer of snow is super thick, then 320cm would be better, but it’s also heavier to carry and not so efficient / fast to operate. Also, if the conditions are too hazardous… stay in the hut. The mountain is patient, and it will wait. Finally, there are three simple rules to remember: the probing distance should be about 10 inches hole-to-hole (for the area pre-located with the transceiver), always probe at 90 degrees to the surface of snow (to maximize the reach of the probe), and if you locate a person, start digging without removing the probe from the snow, so it’s easy to stay on target when shoveling.
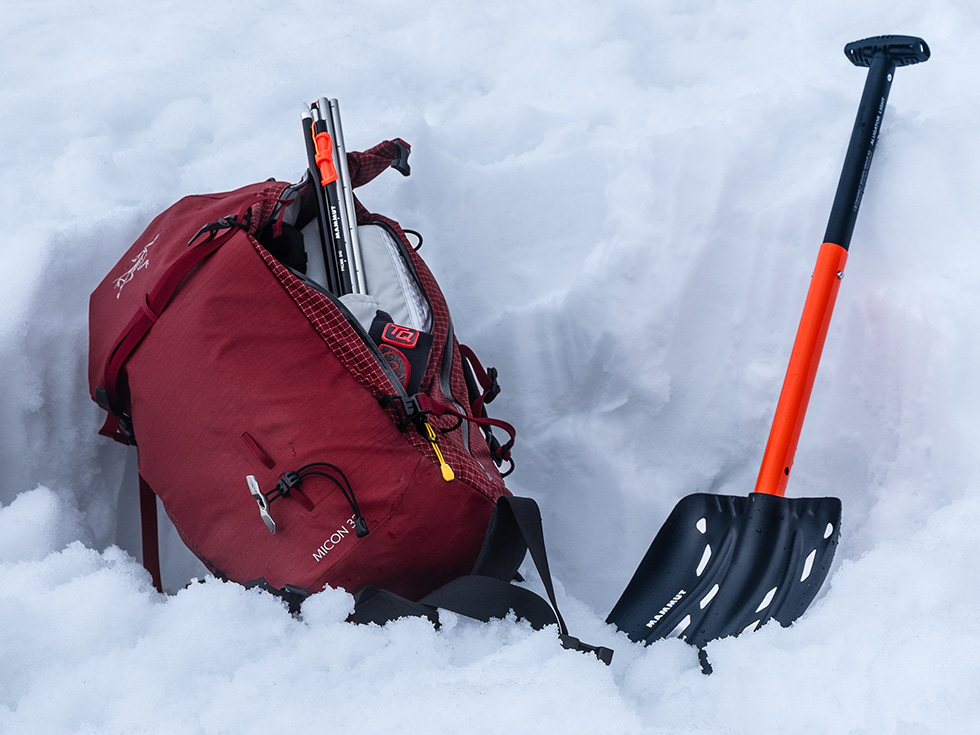
The last component is an avalanche shovel. A good example is this Mammut shovel – it is lightweight but sturdy and with a metal blade. An avalanche field is not a fresh powder you experience during a freeride – it’s more like heavy soil, and it gets harder and harder with time and denser the deeper you dig. On the bottom it’s very heavy, compressed and icy, almost like concrete. So, a hardened aluminum blade is a must; forget about carbon or other fancy composites. The shaft is usually made of metal too – think of it as a hard-working tool. A shaft can be just one piece, but a telescopic is more convenient to carry in a backpack. A T-handle is the most popular, but a D-handle could be better if you often use mitts. Most shovels have holes in the blade, making them a bit lighter but not compromising snow-moving efficiency. But why are there holes? To use a shovel’s blade as a snow anchor for self-belay.
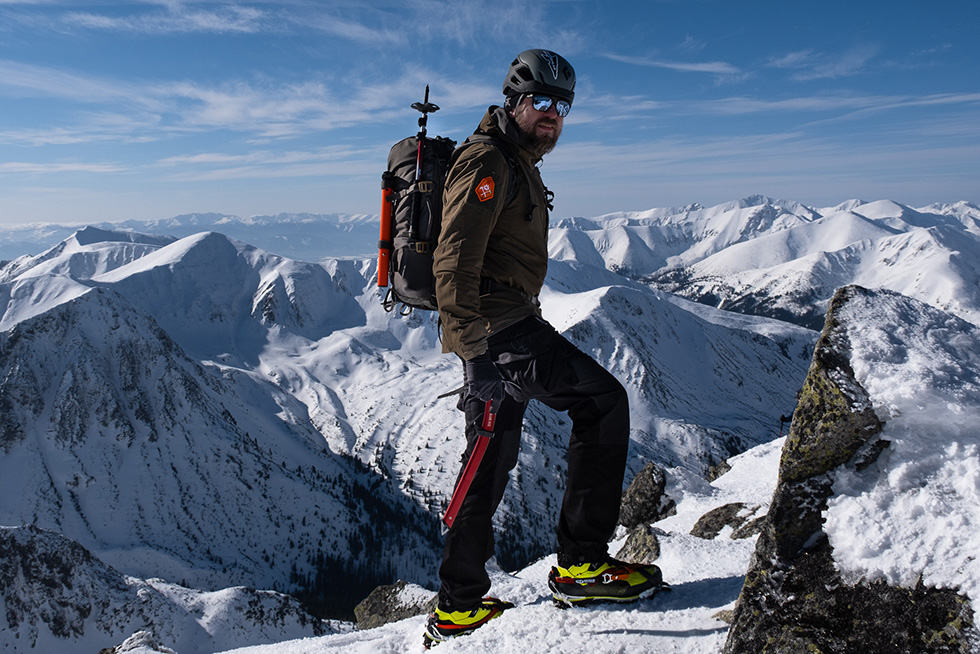
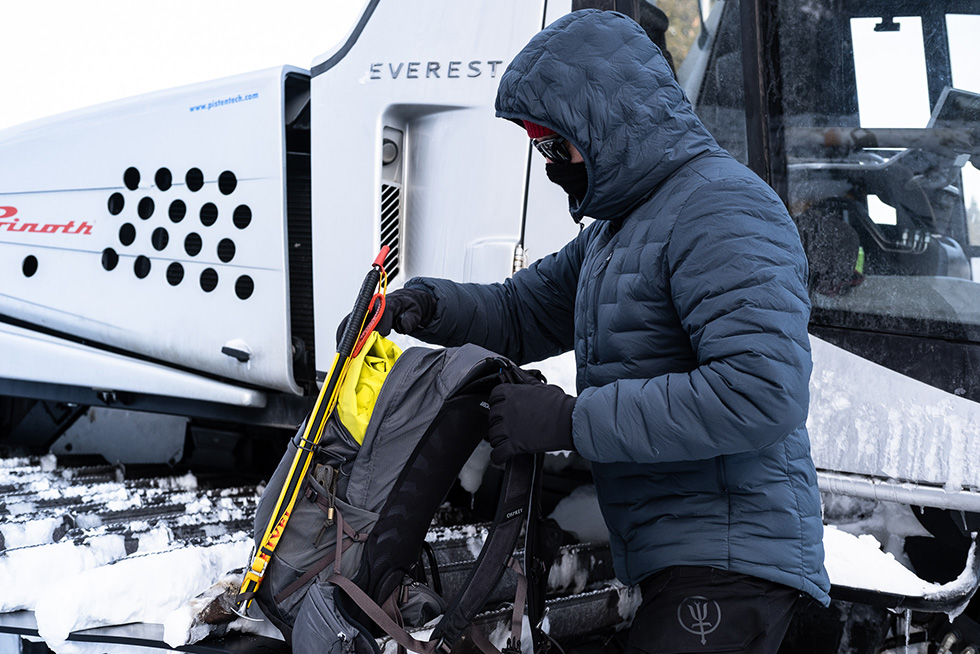
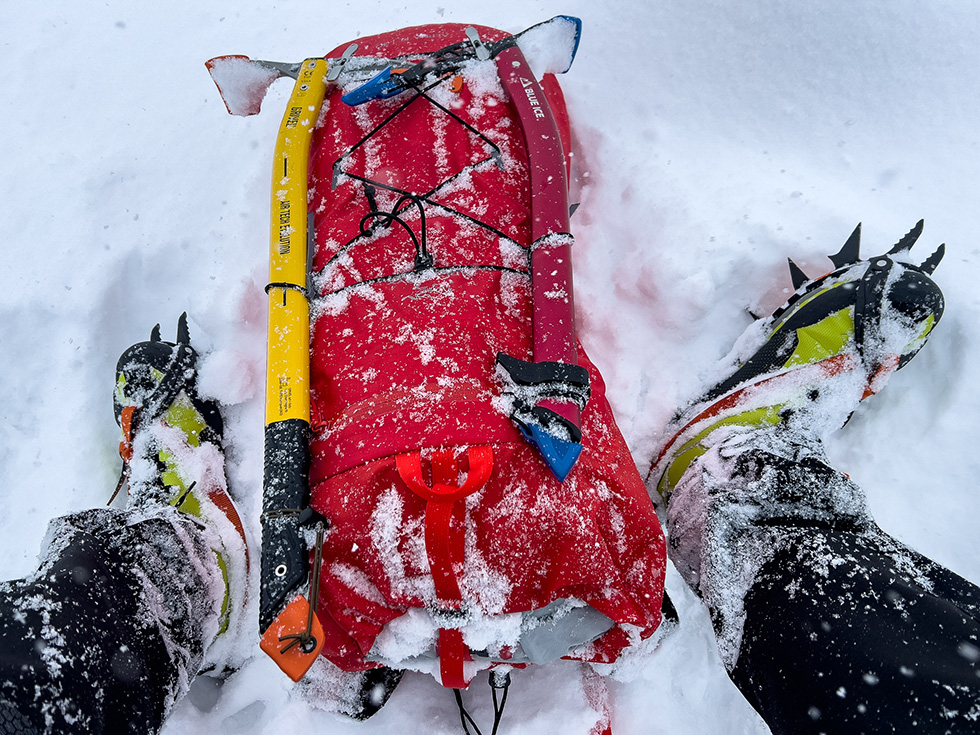
Winter Mountaineering Backpack
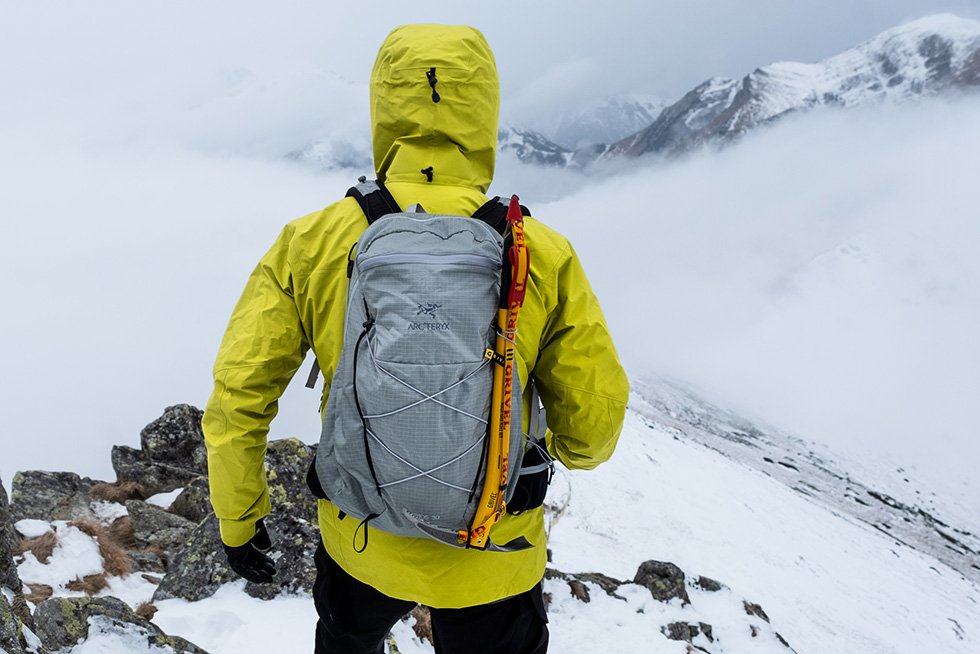
To carry all the stuff comfortably, you need a good backpack. Size-wise, I’d recommend about 30L as a golden standard. Going down to even 20L is possible, but either you have the latest and greatest ultralight gear in your arsenal, or you compromise on what you take with you. Or you’re a pro and really know what you’re doing (but then you don’t need to read this article anyway).
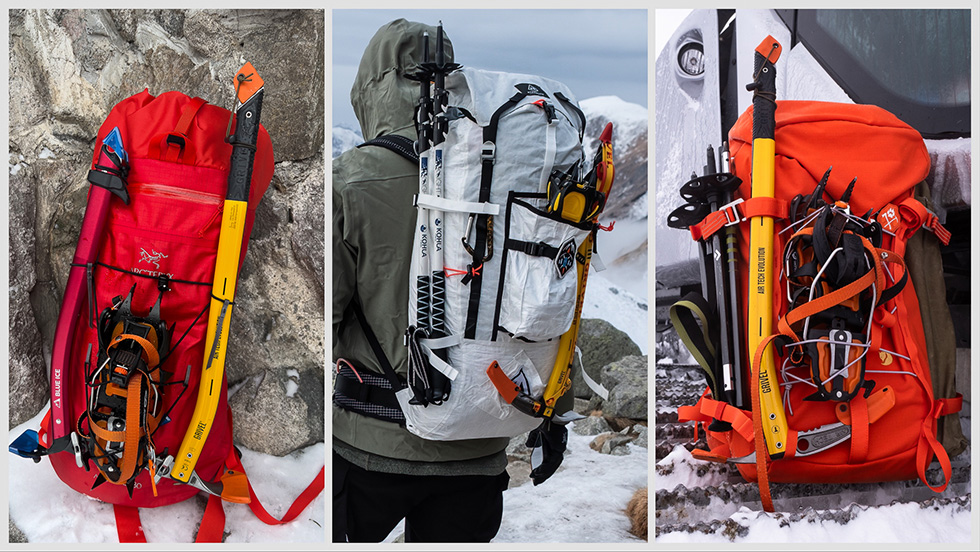
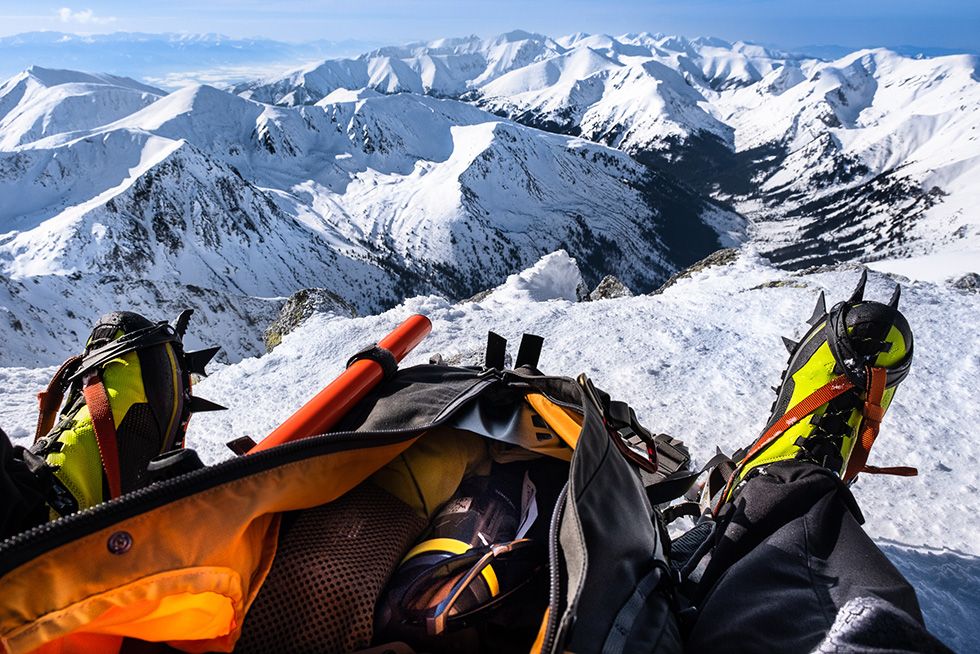
My usual choice for most winter mountaineering outings is a dedicated winter climbing pack. I’ve been using the Arc’teryx Alpha FL 30 for many seasons. It has a fully waterproof laminated construction, carries comfortably, and it’s incredibly durable. It is also very slick and nimble due to its climbing pedigree. You can easily attach two ice axes, trekking poles, and crampons to the outside. Still, I try to keep as much gear as possible inside (especially crampons in a dedicated protective bag) – any gear on the outside is a potential hazard of catching on rock or ice, or a mountaineering partner. For some, the downside of the Alpha FL30 is minimal organization and lack of a quick-access avalanche-kit pocket. Good alternatives are the Deuter Guide series, Fjällräven Bergtagen, or winter climbing packs by Mammut, Hyperlite Mountain Gear, Salewa, Patagonia, Black Diamond, and many more manufacturers. And also an all-season general mountaineering pack like the Arc’teryx Aerios 30 would work too.
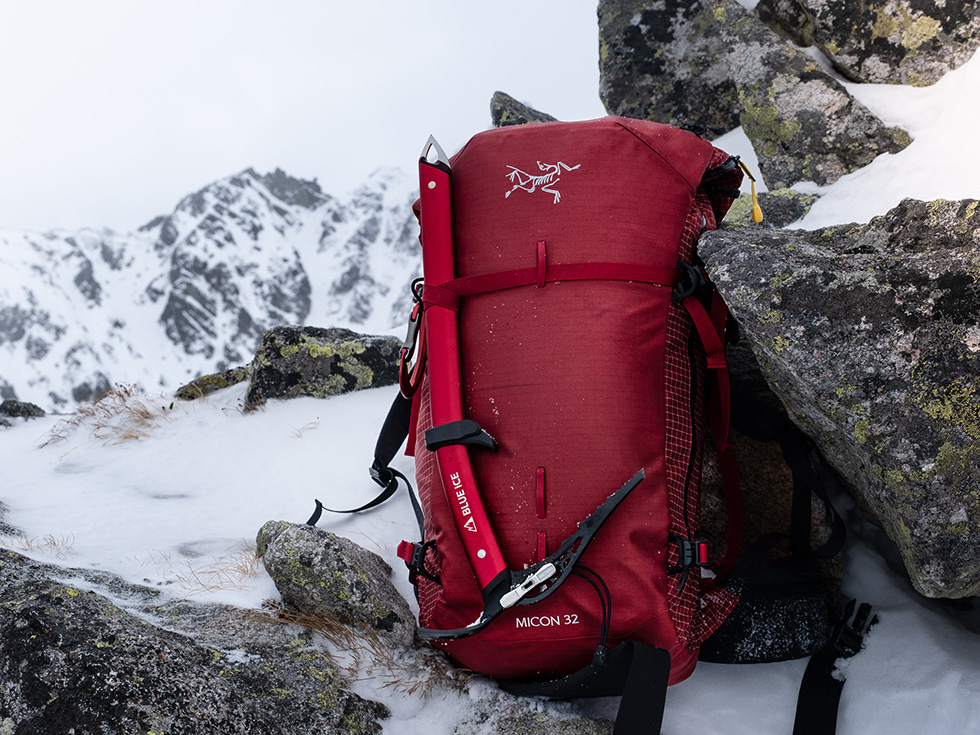
Another suitable choice is a compact ski touring backpack like the Arc’teryx Micon 32. Ski touring packs are usually very comfortable and sturdy but still quite lightweight, considering all the extra features. In the Micon 32 the main cavity is easily accessible either via the top opening or a side waterproof zipper. It’s a roll-top design, so it’s easy to operate wearing gloves and fully scalable to your needs. And there is a dedicated front pocket for avalanche gear (shovel and probe). The top zipper pocket is waterproof too, with enough space for a headlamp, goggles, some snacks, etc.
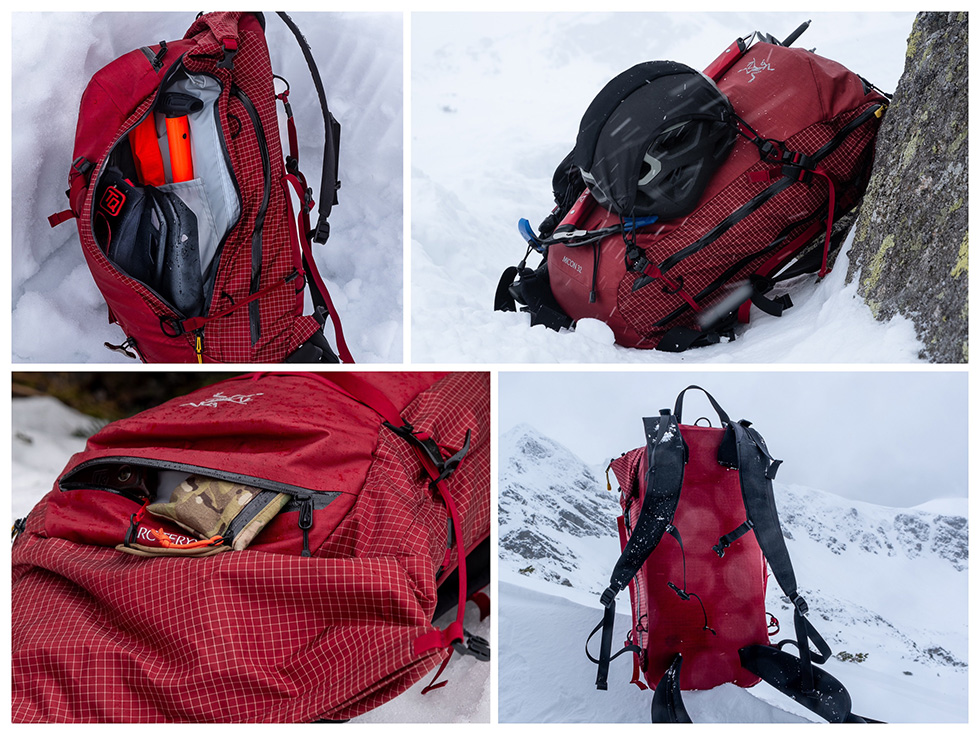
The harness and back panel are optimized for winter use – the padding is slightly thinner and denser than in classic summer packs, mainly for ease of movement and better fit on 2-3 clothing layers, which partly work as sort of padding themselves. The finish of the straps and back is very different from a typical hiking pack – any kind of mesh would be a snow magnet, which would turn into a layer of ice during the hike. So instead, the finish is smooth, tightly woven, and neither collects snow nor absorbs water.
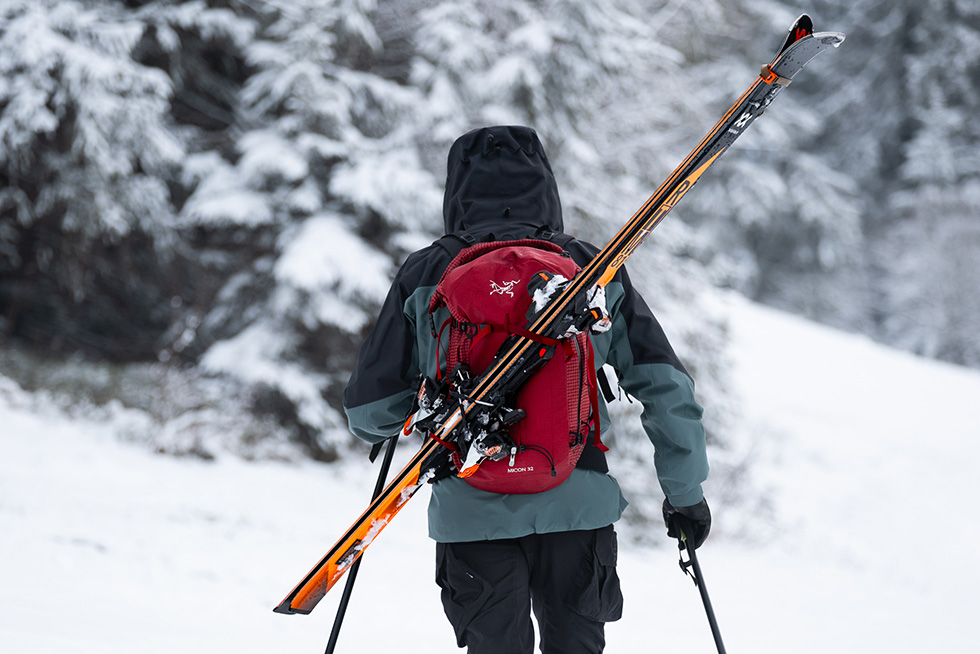
It’s a touring pack, so the outside is ready to attach winter equipment. It’s no problem to attach folded trekking poles, an ice axe, and of course, skis – both in A-frame style and faster-to-deploy diagonal carry. The fabric is more resistant to cuts or tears than a typical nylon in a summer pack. Even the front panel is padded too, so whatever you carry inside is well protected from ski edges or other hard or edged equipment carried on the pack. All in all, the Micon 32 is a very well-designed pack – surely made for (and I suspect also by) winter mountain sports enthusiasts.
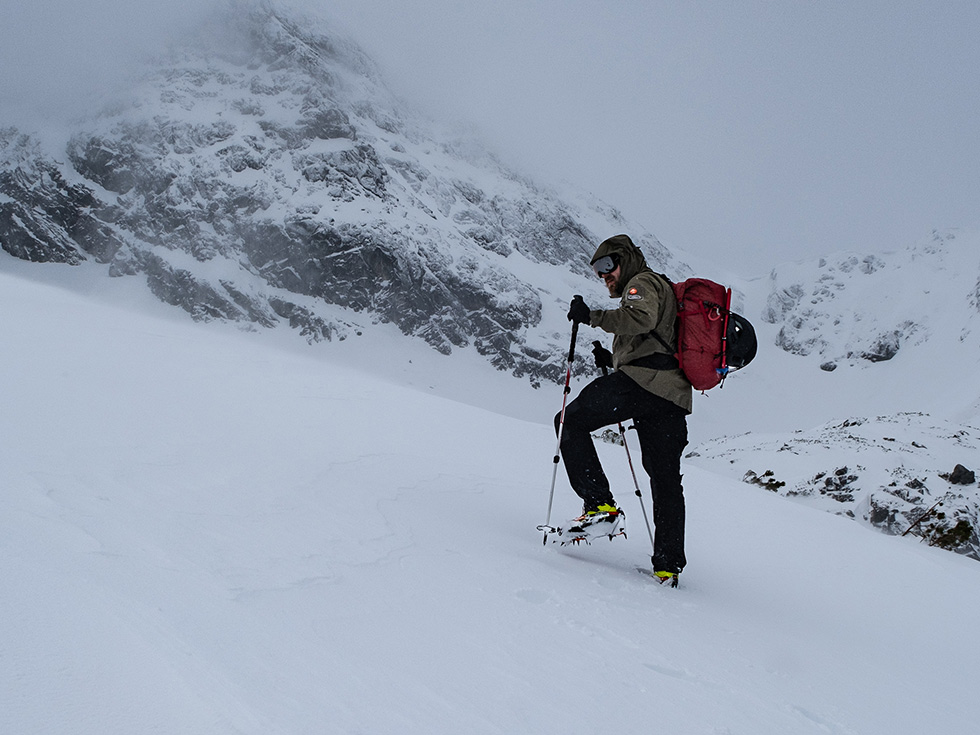
Crampons/Spikes

Don’t even think of winter mountaineering without crampons in your toolbox. They are as necessary as boots themselves because you just can’t walk on hard snow and ice without crampons. Classic 10 or 12 spikes steel models are the best: Grivel G10 or G12, Climbing Technology Nupste or Lycan, Petzl Irvis or Vasak – just to name a few. Basket (or C1) crampons are most popular as first crampons, as they don’t require special crampon-compatible boots with a heel weld. But still a stiff sole (B1 at least) is a must, otherwise you may lose the crampons when scrambling and that won’t be funny. If you own B2 or B3 boots, I’d suggest semi-automatic crampons (or C2) with a front basket and heel lever – this allows for any winter scrambling, climbing, alpinism, glacier use, etc. These are the most versatile crampons, quick to put on boots and extremely reliable. Fully automatic C3 ones require special boots and special care when mounting, and these should be left to real pros – for most users, they cause more problems than benefits. And don’t go wild, forget about mono-spikes, ultralights, etc. You need reliable and robust tools, not fancy specialized models. Buy a small file for metal and keep the spikes sharp. Crampons are usually not stainless, so always dry them well, and a bit of WD40 or other oil for after-season storage is a good idea. And always adjust them for length at home before going mountaineering.
Running spikes or walking spikes are great for the approach phase or in the valley. They say that what you carry on foot weighs four times more than in a pack, and that is true. With crampons on your boots, you have to lift about an additional pound with each single step. So on a long approach it’s much better to put lightweight runner’s spikes on your boots and save crampons for technical terrain only. It adds some additional weight to your kit, but in the end it’s much less tiring during the whole day. So go light – the lighter, the better. The Grivel Explorer LT is one of the lightest (200g a pair), and even a pair of the classic sturdy Grivel Explorers at 450g weigh less than a single G12 crampon. Just don’t use them for scrambling; they are not designed as a weight-bearing device for too steep terrain.
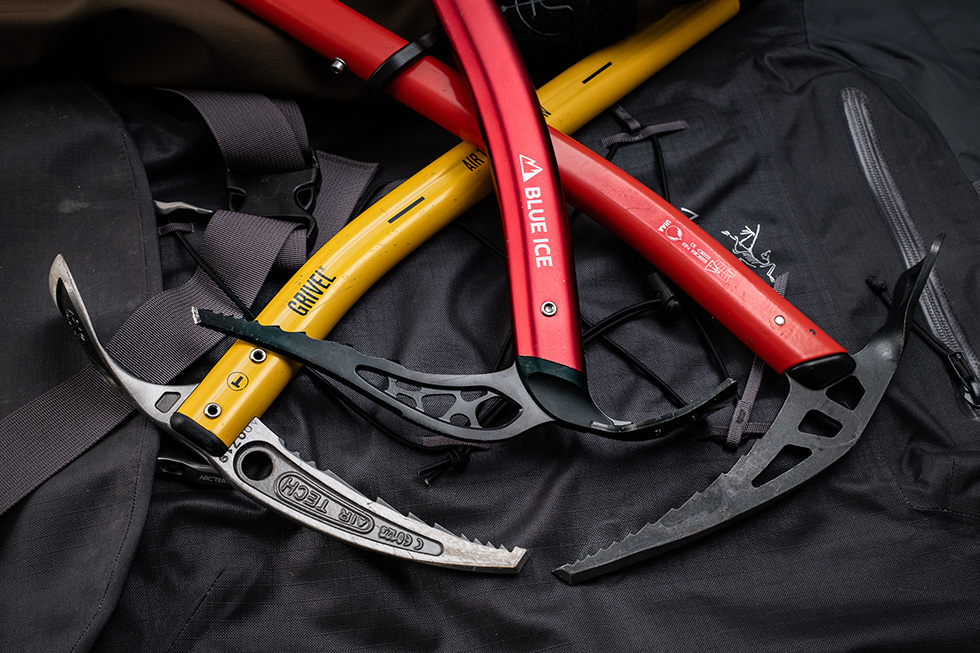
Ice Axe
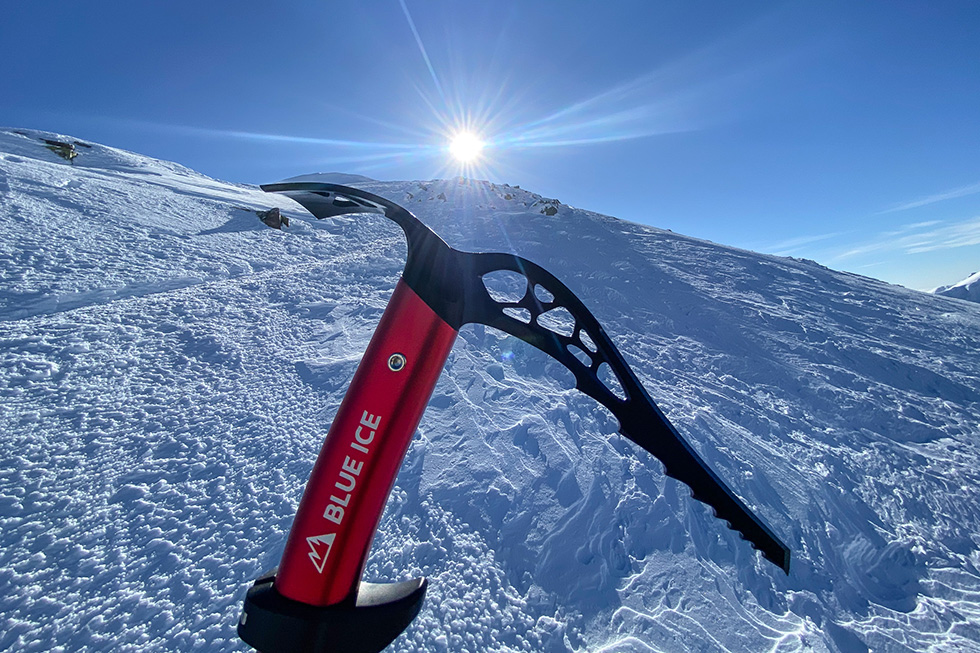
An ice axe, or piolet, is a denotation of winter mountaineering. It’s a symbol of adventure, strength, and dedication to mountain sports. Indeed, this is the single item that is absolutely necessary for winter scrambling, and which is a true lifesaver up there on winter trails.
You will use a piolet mainly for three reasons: as a third contact point on ice and snow for self-arrest, as a climbing device, and as an emergency brake. The latter one is the most important – if you stumble in steep, icy terrain, then ice axe braking is the only way to stop your fall down the wall (usually fatal). So even if you buy a piolet, take your time, do a 1-day winter mountaineering course, and learn how to stop the fall with an ice axe in head-up and head-down position. Usually, it takes 3 to 5 seconds before the speed makes your journey down the hill unstoppable. It’s a basic but crucial skill for any winter mountaineer.
All you need is a simple walking ice axe. It’s not a curvy climber’s ice-tool, designed for different uses. So find one with a straight or slightly bent shaft and simple head with a sharp pick on one side (for climbing and braking) and adze on the other end (for shaping ice and snow on rare occasions). The shaft should be finished with a spike, mostly for piercing through the icy surface of snow when walking up/down the mountain.
The right length is a never-ending debate, but in theory it should give you an easy 3dr contact point (with a spike) when climbing snowy terrain at a 30 to 40-degree angle. Today’s school of ice axe length says – when held by the head it should end in the middle of your calf. Some years ago, we used to hear, “It should touch your ankle,” but it was just too long. Generally, people tend to use a piolet which is too long for them. It’s not a walking cane! It’s better and safer to have it a bit too short, than too long. There are two reasons: in more dangerous, steeper terrain, a shorter shaft is easier to use since the terrain in front of you is higher. But also a shorter piolet is easier and faster to maneuver when braking, so you can stop the fall quicker – and seconds matter in this case. So go to a brick-and-mortar shop, ask for advice, and try two to three models. With time, you’ll add a second one to your arsenal, so you can choose one depending on the terrain – longer for walking in glacial areas and on hills, shorter and lighter for more vertiginous steep scrambling. And sometimes it’s good to take both.
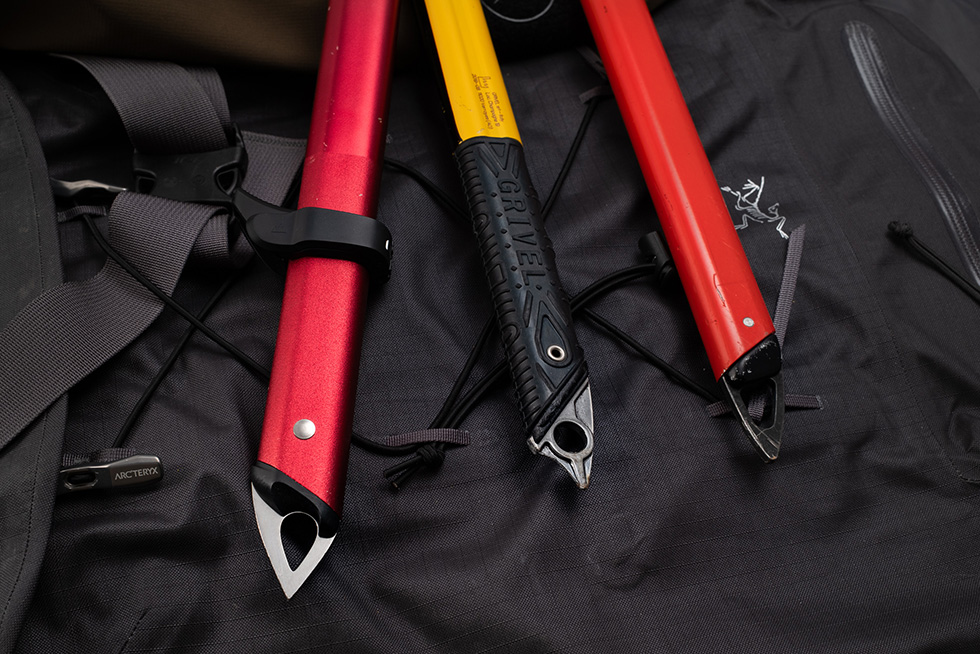
I started winter mountaineering with a simple Edelrid piolet. I mostly use a classic Grivel AirTech Evo as a longer one and BlueIce Akila as a shorter and lighter option. I can also recommend the Petzl Summit Evo and Climbing Technology Alpine Tour Plus, but the market is flooded with awesome ice axes these days. Just check if it’s UIAA certified. For mountaineering and scrambling it doesn’t matter if it is UIAA Type 1 (CEN-B) or Type 2 (CEN-T) – the difference is that the T-type is stronger (but also heavier) and can be safely used as a belay device when anchored in the snow. I use the B-type more often, as they are considerably lighter and still strong enough for anything I do.
Some quick extra tips: keep the pick sharp; if you hit a rock a couple of times, sharpen it in the shelter before the next outing. You can use a standard metal file for this; even a very small one in a multitool is good enough. When walking with a piolet on your pack, use protective covers on the sharp spikes; otherwise, it’s easy to cut your partner’s pack or jacket. A wrist loop on some models should be used only for climbing (if anything) – don’t put it on your wrist when using an ice axe as a self-arrest tool. You should always keep the piolet by the head, with the hand that is facing the wall (or high terrain) – so during each turn, you should change the hand – try that with a wrist lanyard. When traversing a steep wall (especially with a heavy pack or/and in windy conditions), it’s good to have a piolet in the “wall side” hand and an extended trekking pole in the “air side” hand for added stability.
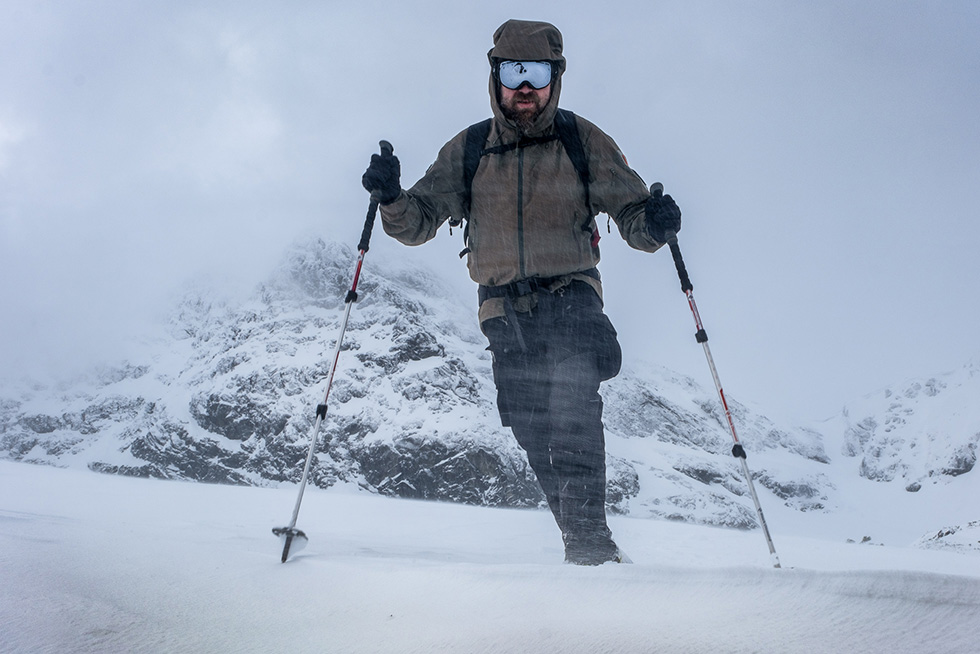
Trekking Poles
This one is quite easy – go for sturdy 3-piece poles with a glove-friendly lever locking system. Avoid any kind of twist-locks, which are impossible to operate when frozen and they break easily. I trust mostly two companies: Black Diamond (#1 in this game) and Kohla, with HQ located in the heart of the Alps, but as usual, the choice is quite extensive. Also, I’d avoid ultralight probe-like folded poles for winter use. Yes, they are lighter and take up less space when folded, but they are also more fragile and can’t be adjusted to very short lengths.
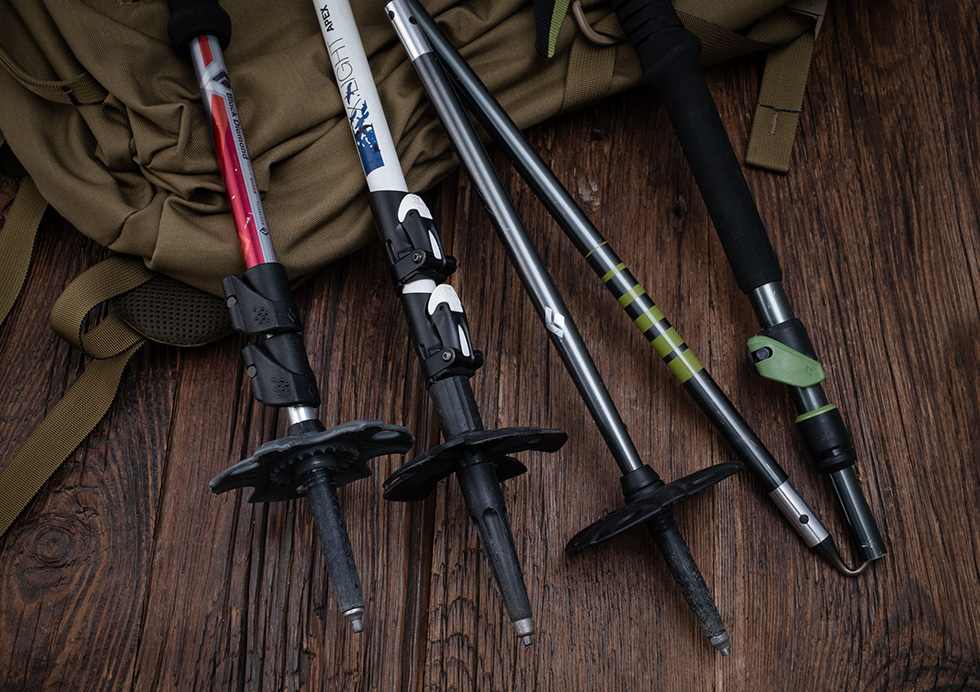
A folded trekking pole is often used as a climbing aid in one hand, while an ice axe is held in the other hand. You can’t do it with probe-like folding poles, which are better suited for the other seasons. So just buy sturdy and simple 3-piece trekking poles with big lever locks, which are easy to operate in the cold. And you’re done.
Gloves
I could write a separate article about gloves alone. The wrong choice of gloves can ruin your day just as fast as choosing the wrong shoes. I’d divide mountaineering gloves into three main categories plus a special one.
A) Base layer gloves, or liners. Very thin and breathable woven gloves are made of Merino wool or synthetic yarn (or mix). They are super lightweight and can be used alone or as a liner for thicker gloves for extra warmth and to enhance sweat wicking to the outside. Cheap, popular, very useful – I never leave the shelter without a pair in a pocket.
B) Active insulation / softshell gloves for climbing, scrambling, and similar high-output activities. Workhorse gloves, these are surely the most used. These gloves should provide excellent dexterity, secure grip when operating an ice axe, durable palm material (leather works best), and light active insulation depending on temperature, wind, and overall weather conditions. These gloves should be very breathable, so I’d avoid a true waterproof membrane. Instead go either for rugged fleece or a softshell membrane like a Gore-Tex Infinium. Classic examples: Arc’teryx Venta AR or Alpha SL, Black Diamond Terminator or Punisher, Hestra Ergo Grip Vektor, etc. This group should be a real foundation of your glove system. It’s also super important to find gloves that fit you well, as you need to operate mountaineering equipment in these gloves (pack, trekking poles, crampons, and ice axe, of course).
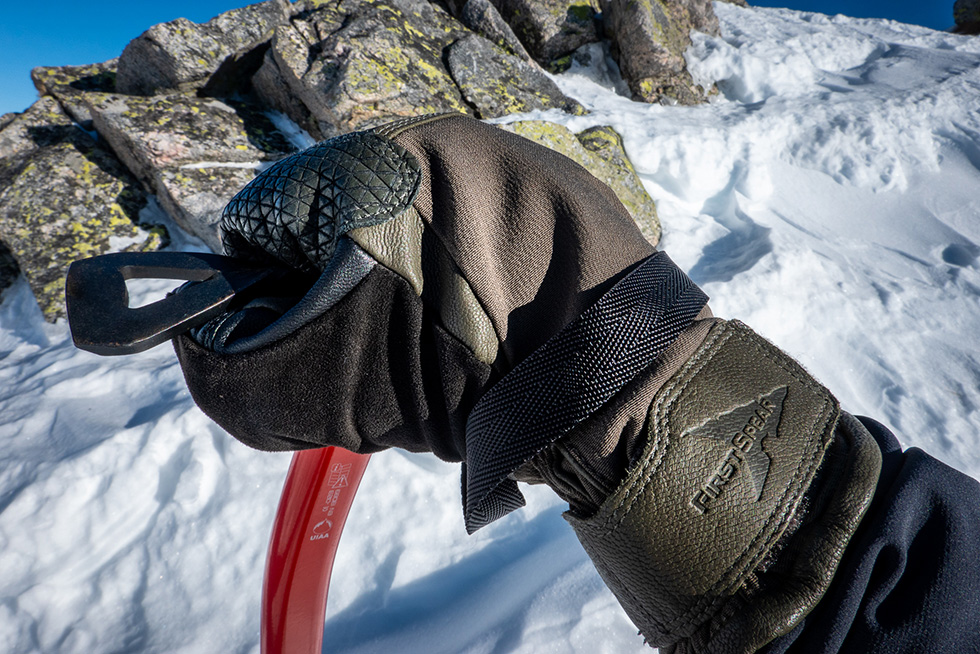
C) Cold weather gloves, or even mitts, for extreme cold, blizzards, and other severe weather conditions. These gloves should provide extra warmth and enhanced protection against the elements, very often with a built-in waterproof membrane like Gore-Tex, eVent, NeoShell, etc. These gloves are more bulky and heavy, and dexterity is often compromised. This is a very broad range of gloves, starting with my trusty First Spear Cold Climate Gloves, through classic models like the Black Diamond Mission MX, the Hestra Army Leather Blizzard, and to heavy mitts like the Black Diamond Guide Finger (3-finger mitts) or Hestra Patrol Gauntlet Mitts.
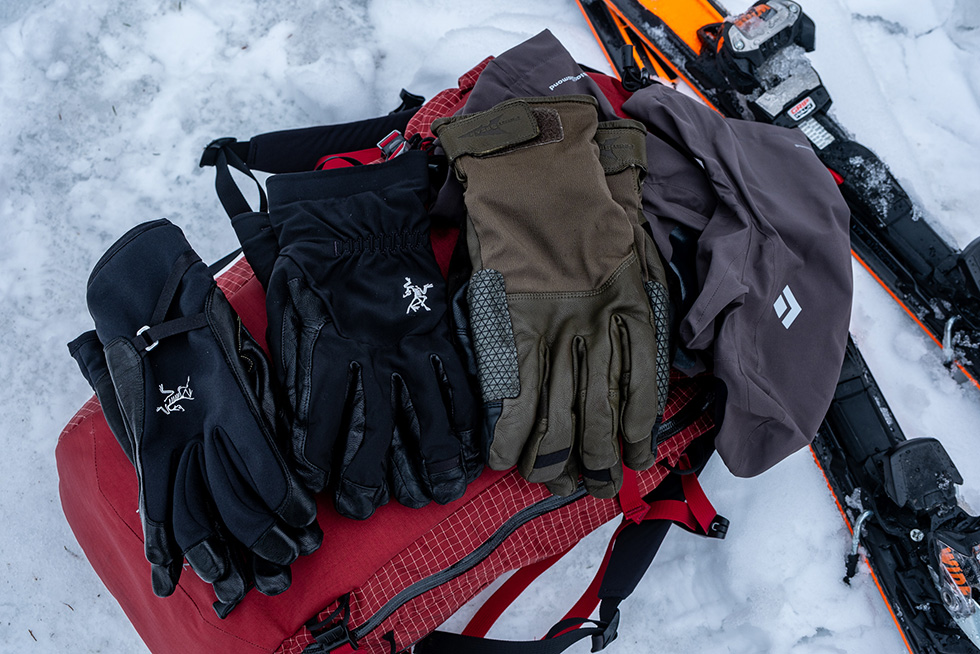
But there’s a fourth kind of gloves, very often omitted – waterproof shell mitts. It’s just a slightly oversized waterproof membrane in the form of a mitt, which you can put on your regular gloves to make them waterproof. But they provide extra warmth as well by trapping air around inner gloves. They are super lightweight and packable (just a thin shell) – it’s like having an emergency hardshell for your hands. Also when climbing in deep snow or searching/digging the snow after an avalanche, these mitts are like having a superpower.
These days, I often take with me just liners, light insulated climbing softshell gloves, and membrane mitts – that’s all I need most of the time. It’s a very lightweight and effective system. I add extra-warm gloves only if I expect truly severe conditions and low temperatures, like -15 degrees C or less. Otherwise, that three-piece set I mentioned is just perfect.
Helmet
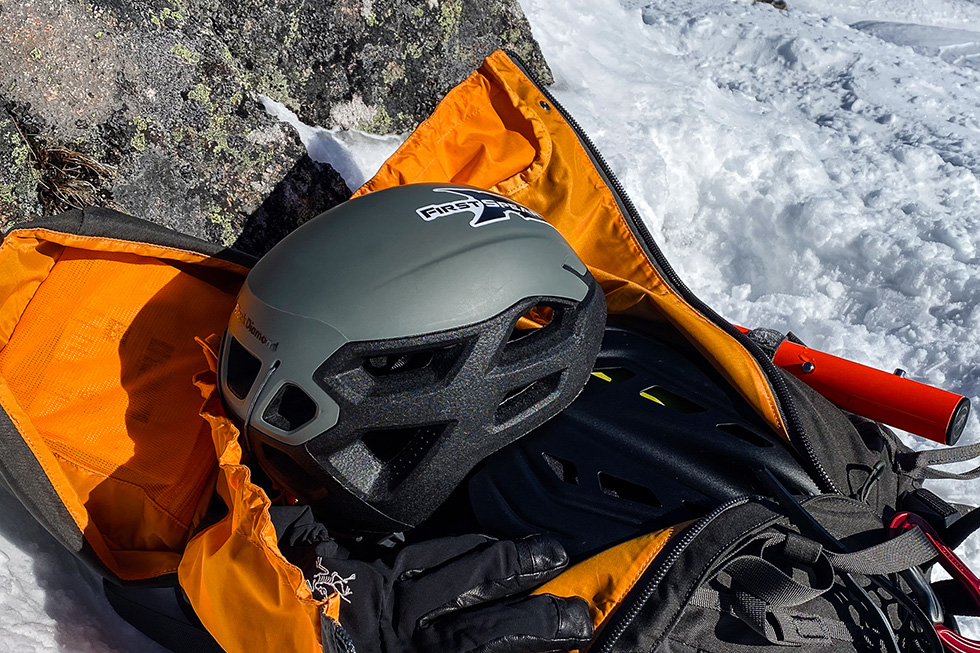
As a rule of thumb – if you need to put crampons on and you’re reaching for an ice axe, you need a mountaineering helmet too. Just make sure it’s a certified helmet produced by a reputable company. Go to a brick-and-mortar shop, ask for advice, and try some. You can find a good helmet like the Black Diamond Half Dome or Petzl Boreo at the $50-$60 range (or even below) so there’s no excuse. I can’t understand the motivation of people who decide not to wear one in the high mountains in the winter.
Snow Goggles and Sunglasses
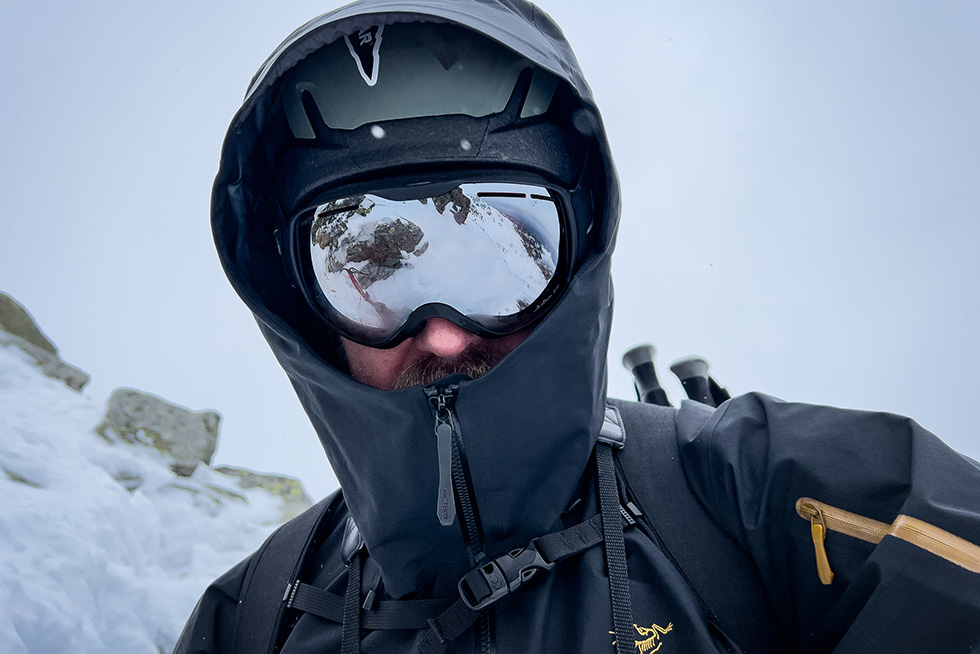
It’s a small item, but it’s a life-saving device in a strong wind and blizzard. Never go winter mountaineering without a good pair of goggles. Also, sunglasses are critical if you want to avoid snow blindness – make sure they are big enough to protect your eyes from wide angles, have a high UV rating, and, if possible, go for polarized lenses, which decrease reflections. Classic “glacier” sunglasses are a good choice, but modern models like the Oakley Anorak are equally fine. The choice is enormous these days, and you can find an adequate model within any budget.
Navigation and Essential Accessories
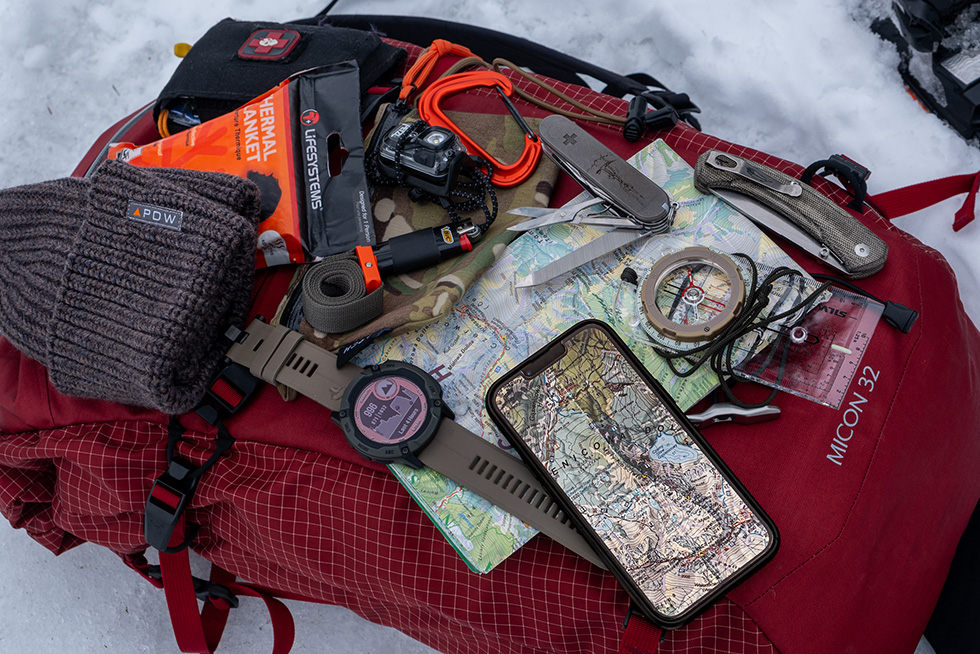
Navigation is essential – keep it simple and have backup. A GPS unit is a great idea, even a smartphone or a navi-capable watch. But always a waterproof paper map should go into your pack. Small hint: take a photo of the same map/area with a mobile – it’s much easier and faster to reach for a phone than for a folding paper map, especially in a strong wind. But still, paper is not dependent on battery power, so it’s the best backup plan. The same with actual navigation, I always have two devices – some sort of GPS and a magnetic compass, even a tiny button style. Losing direction in thick fog/clouds in the mountains is easier than you think, so being able to find a safe azimuth is crucial. Especially in steep alpine mountains.
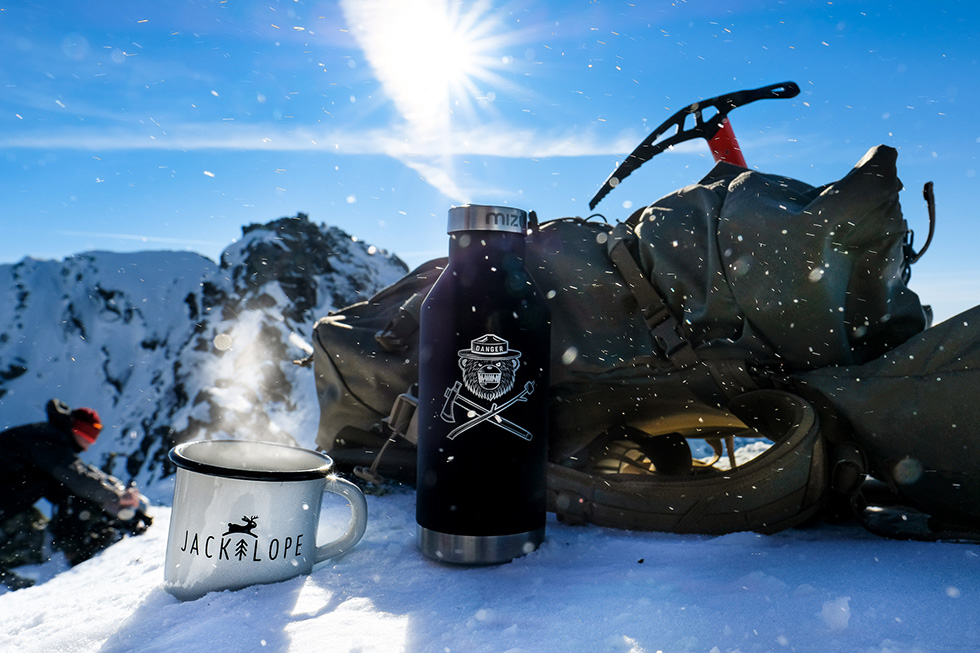
And finally let’s go quickly through some small and self-explanatory but important accessories: headlamp, first-aid kit, emergency thermal blanket. I always carry either a pocket knife or multitool plus a small piece of gorilla tape, 6 ft of paracord, and a BIC lighter for improvised gear repair. A carabiner is always handy, as well as an Austere Manufacturing cam strap. An extra beanie and neck gaiter are also always with me, so I can use lightweight ones, heavier ones, or both together. Calorie-dense snacks and hot coffee (or tea) in an insulated bottle are super important for winter outings, so don’t forget your energy supplies.
I hope this was a good read, and you were able to find some interesting pieces in my article. Just remember, equipment is important and can help, but there’s no substitute for mountaineering skills, which come with time. If you’re just about to start your winter scrambling, you should begin with a weekend winter mountaineering course. They will teach you how to use basic tools like crampons or an ice axe, how to read avalanche alerts, how to assess safety aspects, and finally how to use avalanche equipment. It’s the best investment you can make to ensure safety for you and your mountaineering partners. So stay safe and enjoy the mountains!