Make Your Own Bicycle Pannier
Make Your Own Bicycle Pannier
Bicycle panniers are amazing. They hold the things you’re carrying away from you, so you’re less likely to get sweaty, and they hold the weight low on your bike in order to give you better handling and more balance. However, unlike the messenger bags you see around all over the place, most panniers look like garbage.
They don’t need to, and there are a few select offerings out there that are both functional and attractive; alternatively, it is very easy to turn any bag you like into a pannier. Keen to make your own? Brian Park from the Greatest Conversation showed us a tutorial on how to make one yourself, it was so good we had to share it with you guys.
First Principles
Panniers need to be secured in three places: two points on the rails at the top of the rack, and one somewhere near the bottom of the rack and spaced between the top two. The bottom point preloads the top two points, keeping the bag stable on the rack.
The bag (or bags if you want a matched set) you choose should have a stiff back in order to keep it from flopping dangerously into your rear wheel. If you must turn your favourite unstructured bag into a pannier, reinforce it on the inside with a piece of cardboard or plastic to give it shape.
Similarly, your bag should be large enough to carry your things, but not so large that it hangs down and interferes with your derailleur, or clips your heel while you pedal, or sits so high that your centre of gravity is compromised.
Materials
A suitable bag, 3 hooks, a bungee or spring for your preload assembly, and enough small bolts, washers, and nylock nuts to fasten everything down. Several suppliers and stores sell kits with all the hardware needed, just supply the bag. If you carry valuables, I’d recommend getting a kit which includes a safety handle, making it even more difficult for the bag to fall off.
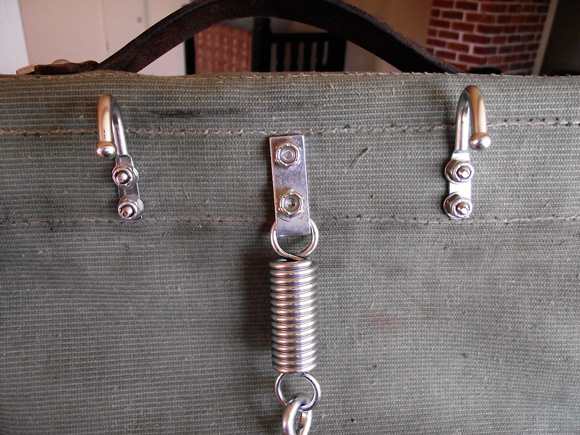
For this project I chose a Swiss Ammunition Bag, and, rather than a premade kit I bought some hardware that fit the aesthetic of the bag a bit better. I chose rope-bind hooks for my two top hooks, and then rather than a bungee I went with an extension spring attached to a hooked turnbuckle for my bottom hook. My total cost was about $35.
—
Step One – Marking
Near the top of the bag find the horizontal middle. Mark it, then measure 2.5” in either direction from that midpoint and mark those two points as well. The two outer marks are where your hooks will mount and the middle one is where your preload assembly will mount, so make sure that all three of your marks are level.
Step Two – Top Hooks
Align the hooks with the outer two marks and find where the bolts will need to go through the bag. Poke holes in the bag’s fabric just large enough for the bolts to go through. If your bag is made from synthetic material, you can heat up an unneeded bolt (use a lighter and hold the bolt with some vice grips) and poke it through to melt the edges of the hole and prevent fraying. If your bag isn’t synthetic, don’t worry about it because your washers should provide enough purchase on the fabric to prevent fraying.
Mount the hooks and tighten all the hardware, making sure you use washers between the bag and all bolts or nuts. I like putting the smooth heads of the bolts on the inside of the bag; it isn’t as pretty from the outside, but having the nuts on the inside can beat the hell out of whatever you’re carrying.
If you’ve used secure hooks, your bag is rigid and structured, and you don’t carry valuables you can stop here. The secure hooks should be enough to keep everything in place and you avoid the added complication of the preload assembly. However, if you want a more secure pannier, I’d recommend completing the last step and using a preload assembly.
Step Three – Preload Assembly
Find the mark you made between the two hooks. This is where your preload assembly will attach. See the photos for how I chose to attach the assembly, but there are many other ways and I’m sure you can think of a good one to suit your needs and materials.
Most pannier racks are 12” from the bottom rail to the top, so make sure that the preload assembly can stretch 11”-13” from the upper hooks. The turnbuckle I used is very useful for this adjustment. You want the assembly to be taut and pulling the upper hooks down onto the rack when it is installed. You may have to adjust this length for your specific pannier rack.
Finally, on larger bags it is good to sew or bolt some sort of band over the preload near the bottom of the bag. This will allow the assembly to expand and contract as needed, but will hold the bag in close to the pannier and not let it flop around. Because the ammo bag I am using in this example is quite small, I’ve skipped this.
Thanks again to Brian and the kind folk at Oakbay Bikes for slicing together such a great tutorial!


 Carry Awards
 Insights
 Liking
 Projects
 Interviews


