Carry Awards
 Insights
 Liking
 Projects
 Interviews
Insights
Prototyping is, objectively, the best part of design. It’s also where the magic happens in my process. Pulling on fabric, dialing in dimensions, making that zipper run super smooth… this is where patience and craft really pay off. My design consultancy, Black Thread Creative, is named after the black-colored thread used in prototype houses all over the world. It’s kind of a nod to my functionality-driven design process.
After I have thoroughly explored the problem and as many ideas as I can muster, it’s time to put rubber on the road and prove my concept. The key theme here is to fail quickly and fail cheaply. Each step works to sort through problems that will rear their heads if not properly handled. Best to do that early, right?
This is a highly iterative process for me, so sometimes I’ll keep several key ideas moving at the same time. I think of them as “themes” or “directions” instead of concepts so I don’t get too rutted into an idea. Keep your head up and remember it’s a process. You should expect to fail at least a few times before you get it right.
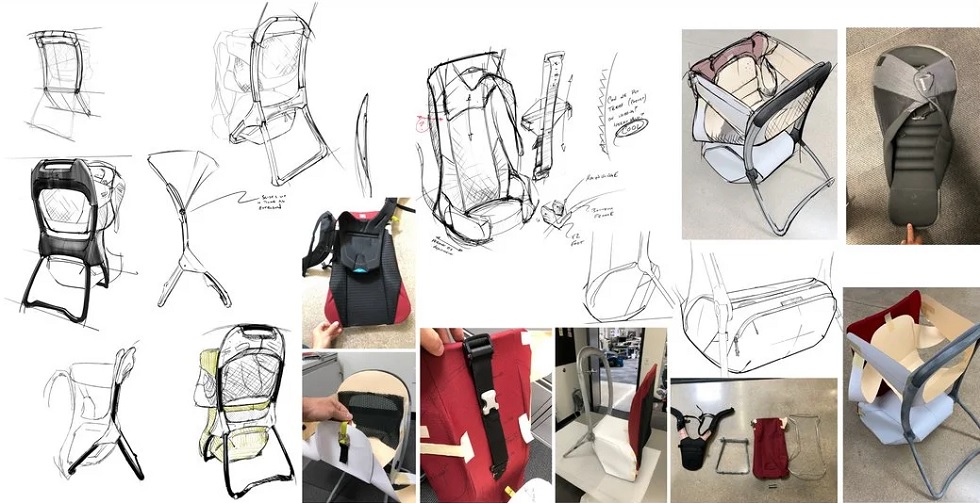
As part of this, I’ll make a concerted effort to keep all my ideas on the table throughout the early stages of the process. As I work, I am always iterating and needing to fall back on early ideas or imagery to move things forward – sort of a one step back/two steps forward sort of process. It’s old-school, but I think hanging sketches and prototypes on the wall can be hugely helpful here.
Orthographic Views
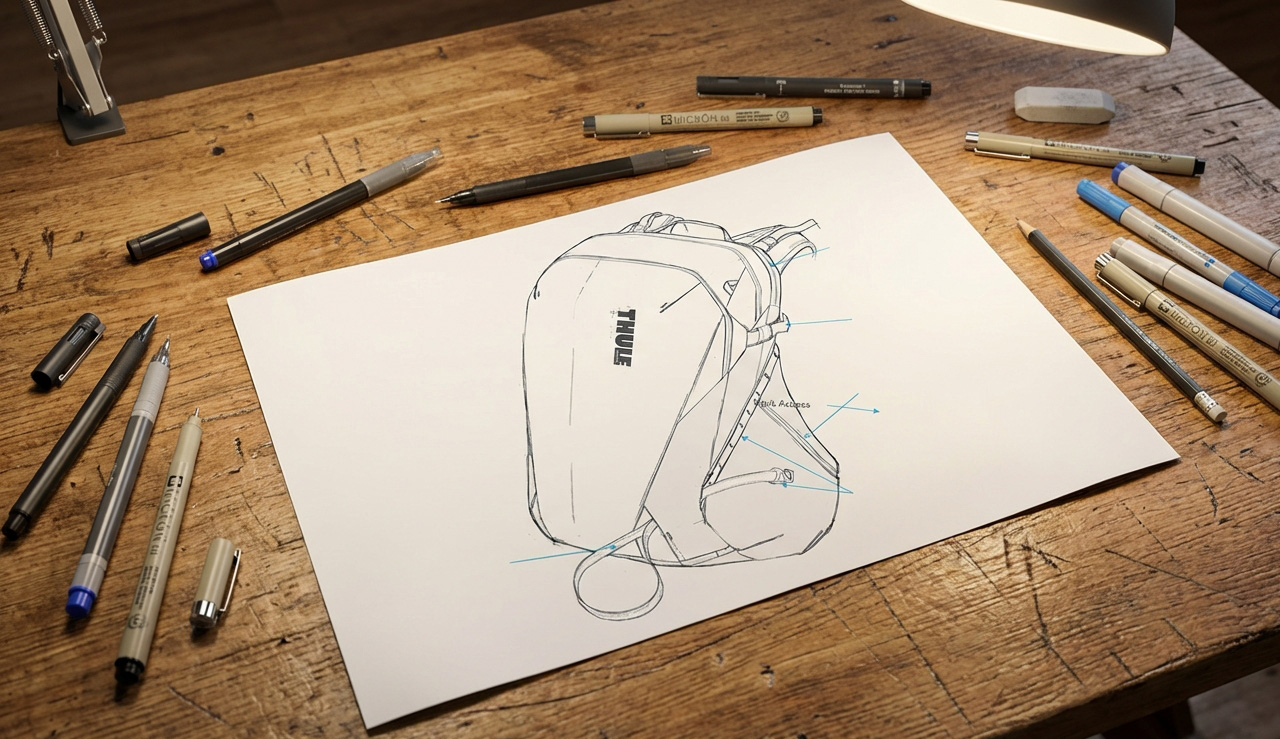
The important first step is to move your sketches into orthographic views. This is an early kind of test of the concept. For those who don’t know, an orthographic view is design-speak for a side/front/top drawing that maintains all of the correct dimensions. You’ll likely never “look” at a product from the exact top or side, but it’s an important exercise to fully understand the form of an object.
Since dimensions are maintained, you can check that pockets are all the right size (think water bottles, laptops, etc.), the zipper paths need to be straight, and the “look” of the orthographics should be as inspiring as the sketch (a wonky ortho will give you a wonky proto). Pay attention to failures and misalignments here – don’t force it. It’s way easier to fail now than to fail later. You can often tell a seasoned designer because they’ll “sketch” an orthographic view right next to the perspective view (super-fast failing).

Work through your details here. How does that pocket finish? Is your binding the right thickness? Do you actually have space for that buckle? Again, this is a test – pay attention to the failures.
Pattern Drawings
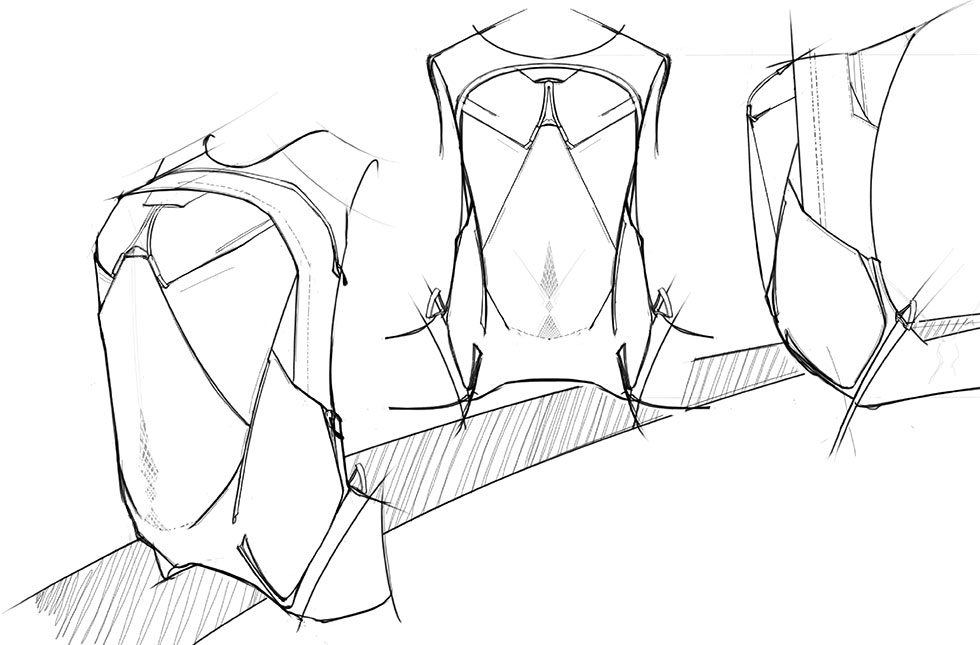
The next step for me is to flatten those orthographics into pattern drawings. I was lucky in my early career to work with some very skilled pattern makers who taught me a lot of tricks for how to quickly translate an angle or a wrap into a flat pattern digitally. Below you can see the transition from sketch to orthographic to pattern drawing.
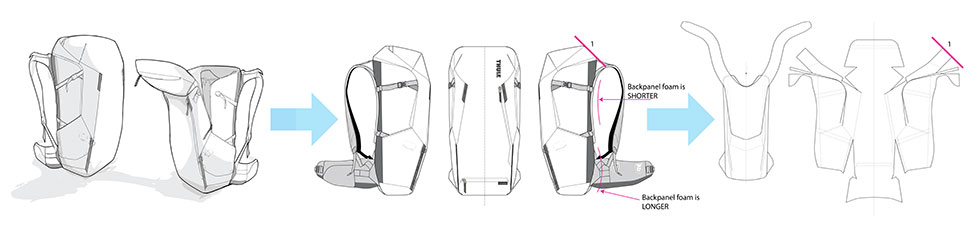
For example, an angle at 1 approximates an angle at 2… wrapping foam over a curve will need an extra 1/2″ of length.
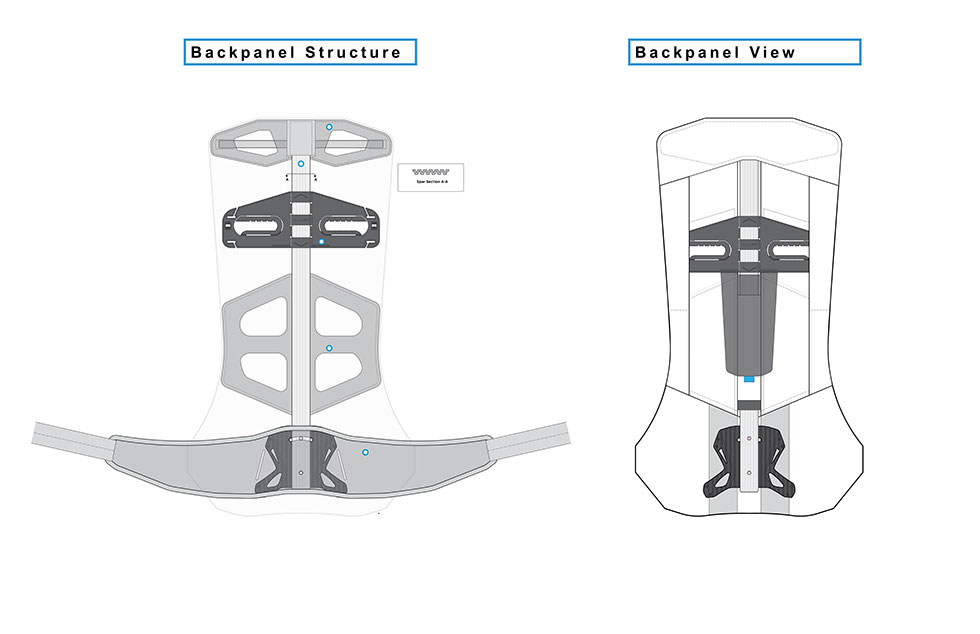
I work in both Illustrator and AutoCAD for this. I find the .dxf format is great for switching back and forth between 2D and 3D CAD. This means a luggage chassis or a backpanel drawing in 3D CAD can be quickly dropped into my pattern files, or I can give an engineer critical dimensions from my patterns to help create parts.
Images here of drawings pulled directly from a .dxf:
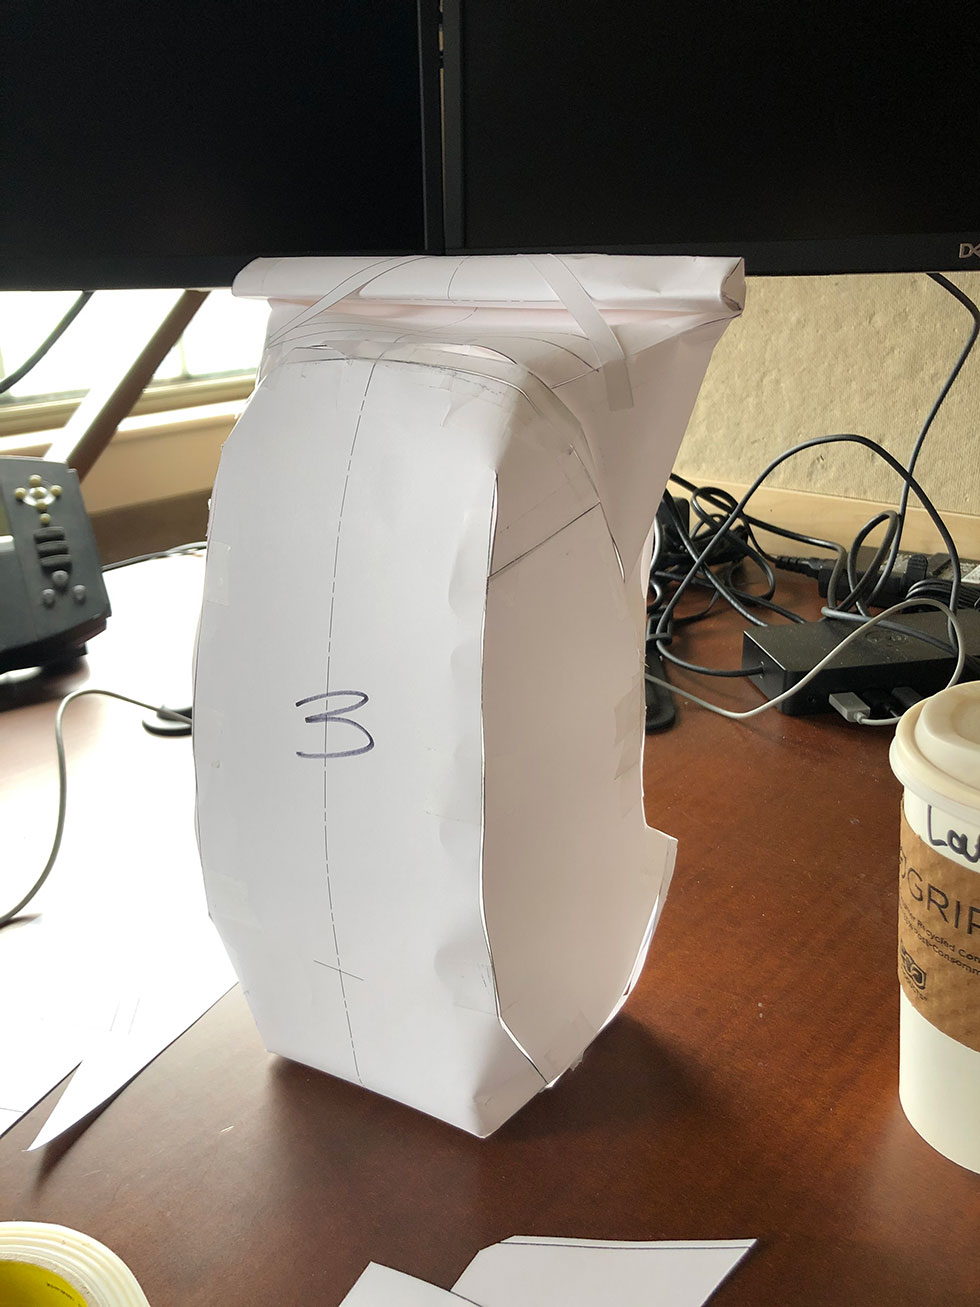
For more difficult patterns I’ll start by carefully cutting my patterns out from paper and card stock – working in whatever scale my desktop printer can handle. This is an interesting tool as it can be much less forgiving than fabric when taking bends and curves.
If you’re careful with your patterns to make sure your seams match, then every overlap and mismatch is a warning sign that something isn’t working (fail!). An angle, a length… pay attention to the fit and it will tell you a lot. Stay away from hard corners if you can. It’s the one thing cardboard WILL do that fabric doesn’t like.
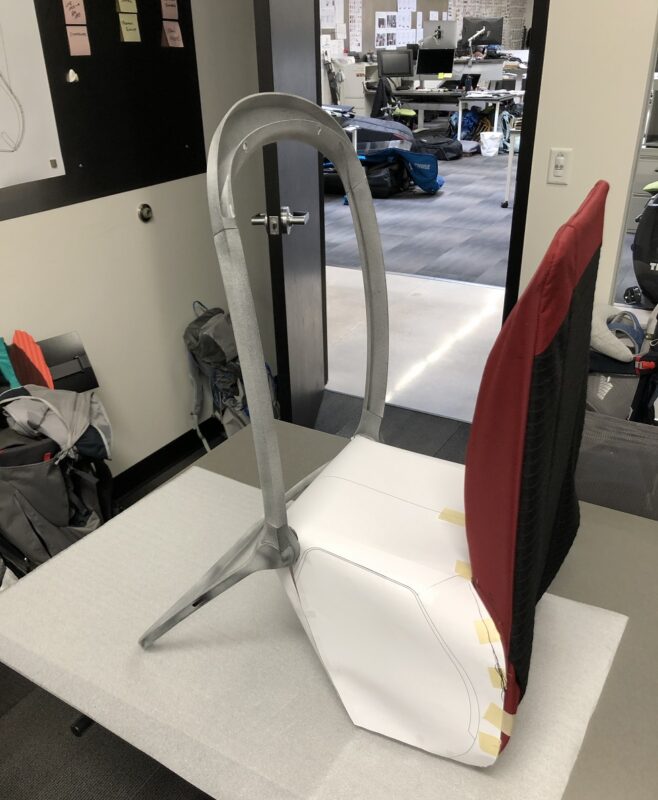
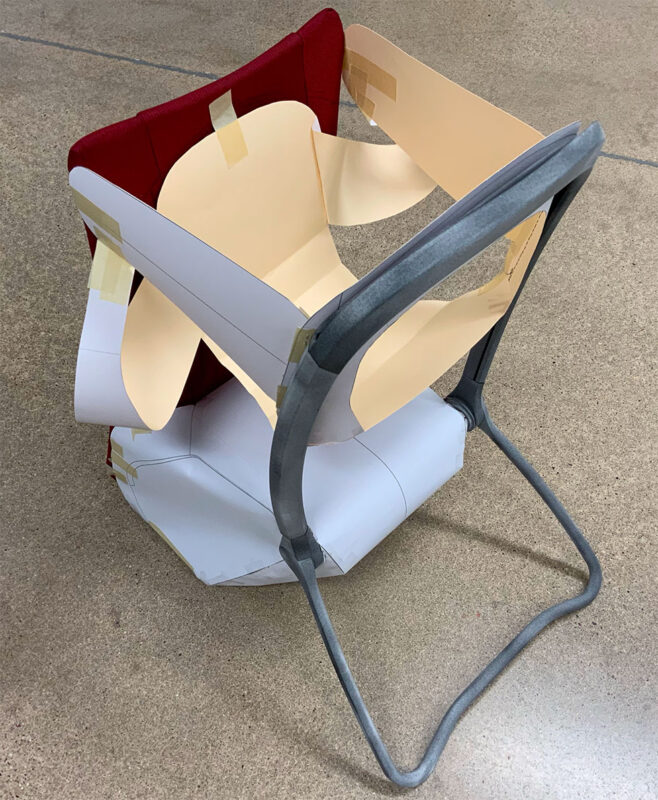
If you have mechanical aspects to your product, test those as well. If you use off-the-shelf hardware it is important to get a sample. If you design a buckle or component it is important to at least have a 3D print of it. Before committing to a prototype, we need to make sure we’ve looked at our design outside of a 3D CAD space. It’s easy to misunderstand product dimensions when looking at it on a screen. Below is an image showing all parts of this process. This is an early mock-up of a 3D-printed frame with a sewn backpanel and card-stock body.
Complete Prototypes
Now it’s time for complete protos: I use an old short-throw projector from eBay and free software called Pattern Projector to project patterns onto fabric… Quick to calibrate and easy to manipulate.
I’ll skip the part about sewing – except that if you are a cut/sew designer you need to know how to sew – full stop. Take the time and learn… okay, off my soapbox now. 🙂
Instead let’s talk about how we prototype (a quick note: I consider a prototype to be a complete version of a product. Sketch models, mock-ups, or sewing tests, to me, are different than a “prototype” and come in the previous phases).
A couple of rules I try to follow:
1. Work in complete prototypes.
This doesn’t mean you can’t do mock-ups. Actually do lots of them, but keep them to the point. Be disciplined about what you need to test vs. what you want to see. This takes a lot of patience.
Working in complete prototypes tells you everything you need to know for the next prototype. Said differently, you’ll have a complete list of problems you need to solve for the next round. If you’re disciplined through this process, you can greatly reduce the number of samples you go through.
Working in complete prototypes also means you can field and lab test immediately.
2. Each prototype is my last prototype… until it isn’t.
This means, I don’t leave something until next time. I try to solve it all together in a cohesive solution. And, I don’t get a new prototype until I’ve worked through my complete list of problems.
It is easy to convince yourself that you need to solve problems one at a time – don’t fall into this trap. I have never had a problem I couldn’t overcome with good mock-ups or a modification of the previous sample.
Bonus: The meticulous approach to solving problems cohesively means you are considering your solutions from multiple perspectives at the same time.
Bonus-Bonus: When you finally finish your prototype, there won’t be anything to explain or try to look past. You can freely and objectively evaluate your concept – and so can others.
Bonus-Bonus-Bonus: If you fail – which sometimes, you will – you’ll know it. You can’t hide behind an incomplete solution – which often creates temptation to try to fix a failed concept.
3. Work in full scale.
It doesn’t take much extra time or that much extra money. Unless you are making ornaments for a Christmas tree, build it 1:1.
4. Sew like you mean it.
If you build a complete product in full-scale, people (i.e. YOU) are going to want to test it. Make sure it is built the way you intend. That way, if it fails you have learned something.

Mark Thibadeau is the Owner and Principal Consultant at Black Thread Creative. Find him at: Black Thread Creative; LinkedIn (Mark Thibadeau); LinkedIn (Black Thread Creative)